On May 30th, 2024, Microsoft announced Azure Bastion Premium, featuring the highly anticipated session recording capability. This feature, long requested since Bastion’s general availability in November 2019, marks a significant enhancement.
In my view, session recording is an essential addition to Bastion, as it provides superior compliance and security. It enables the direct recording of Bastion sessions into a Storage Account, bolstering its compliance and security capabilities.
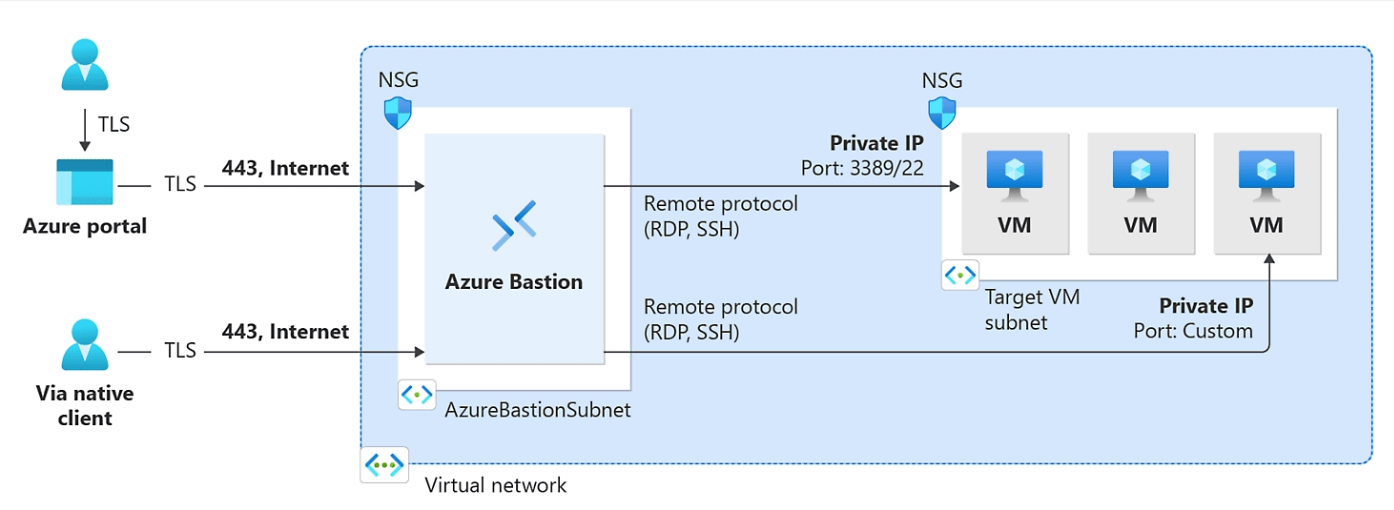
For the uninitiated, Azure Bastion serves as a ‘jumpbox’ for virtual machines hosted on Azure. Its key advantage is eliminating the need to expose virtual machines via a public IP, thus reducing potential attack vectors and fortifying VM security. Azure Bastion is a fully managed, native service that supports both RDP and SSH connections through port 443.
In this blog I will go over how to set this up, and offer a demo/lab with a Bicep template so you can quick-deploy and test the session recording out yourself.
Bastion Premium is currently in Private Preview. It is typically advised not to use it in production environments until it reaches General Availability (GA), as the product may undergo feedback-driven changes and does not have a SLA (usually).
Setup & configuration
Let’s get started with what Azure components we’ll be deploying:
Azure Bastion: Premium with Public IP
Virtual Network with AzureBastionSubnet /26 & vmSubnet /24
Two Virtual Machines (Windows for RDP and Linux for SSH)
Storage Account for sessions to save into
The current Microsoft documentation for this is great, so I won’t be repeating what they have already set out: Configure Bastion session recording
Bicep Deployment
Next, you’ll need to login to Azure CLI and set your subscription context to deploy into, followed by creating the Resource Group:
This file contains bidirectional Unicode text that may be interpreted or compiled differently than what appears below. To review, open the file in an editor that reveals hidden Unicode characters. Learn more about bidirectional Unicode characters
This file contains bidirectional Unicode text that may be interpreted or compiled differently than what appears below. To review, open the file in an editor that reveals hidden Unicode characters. Learn more about bidirectional Unicode characters
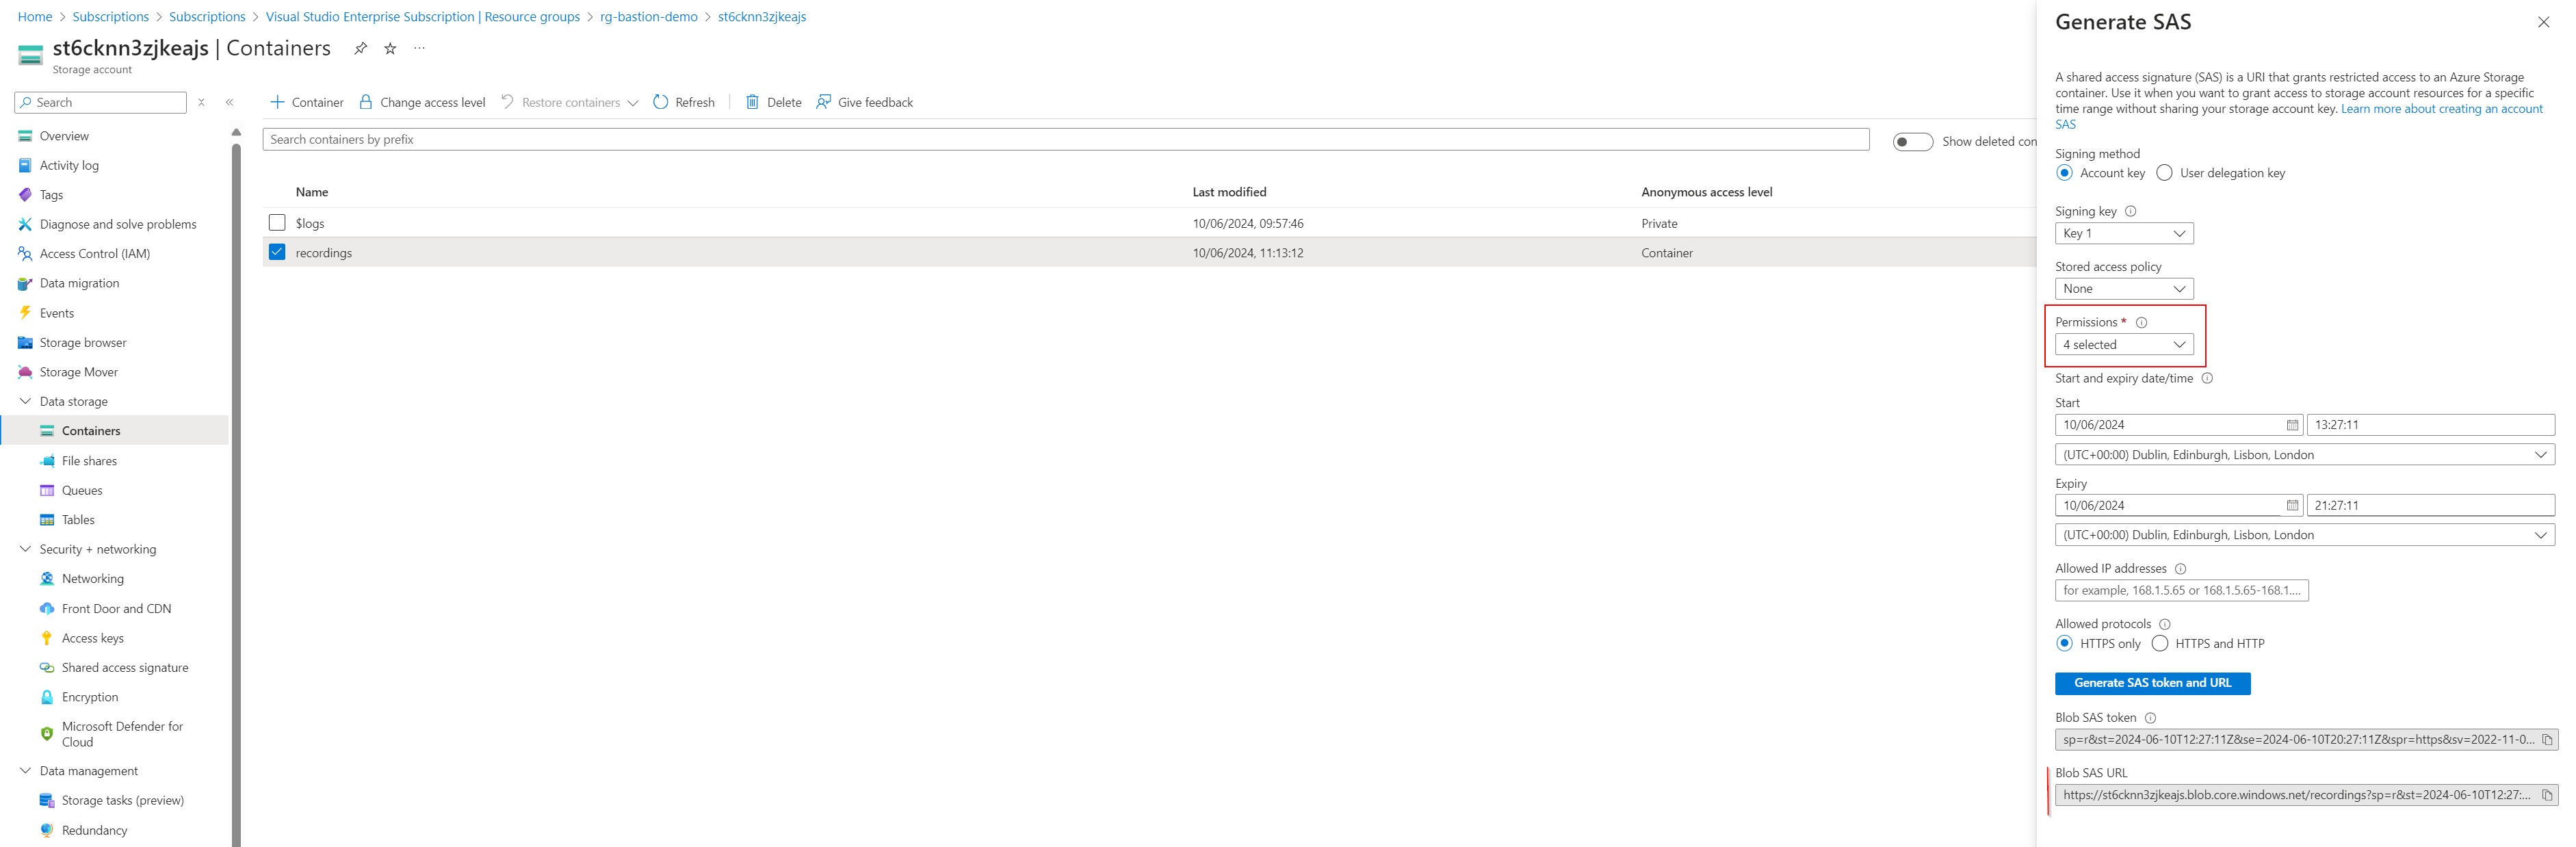
As mentioned before, the Microsoft documentation covers setup nicely. However, for our deployment we still need to perform some manual GUI tasks: Enabling session recording on the Bastion instance & generating a SAS URI for use.
Lastly, notice under Settings > Resource sharing (CORS), the Bicep template has added the Bastion FQDN URL to the blob service:
CORS Allowed origins
Bastion Session Recording
Next, you need to enable the session recording feature within the Bastion instance config in the Portal, which can be done by:
Navigate to the Bastion resource in the Azure porta
Go to Settings > Configuration
Tick session recording (Preview)
Wait for the instance to finish deploying the changes before proceeding
Finally, to complete the setup, configure the Azure Bastion session recordings to save into the container. Use the SAS URL you’ve just generated by following these steps:
Navigate to the Bastion resource in the Azure portal.
Go to Settings > Session recordings.
Click on ‘Add or Update SAS URL’.
Paste the generated SAS URL into the field.
Select ‘Upload’ to finalize the configuration
Recordings
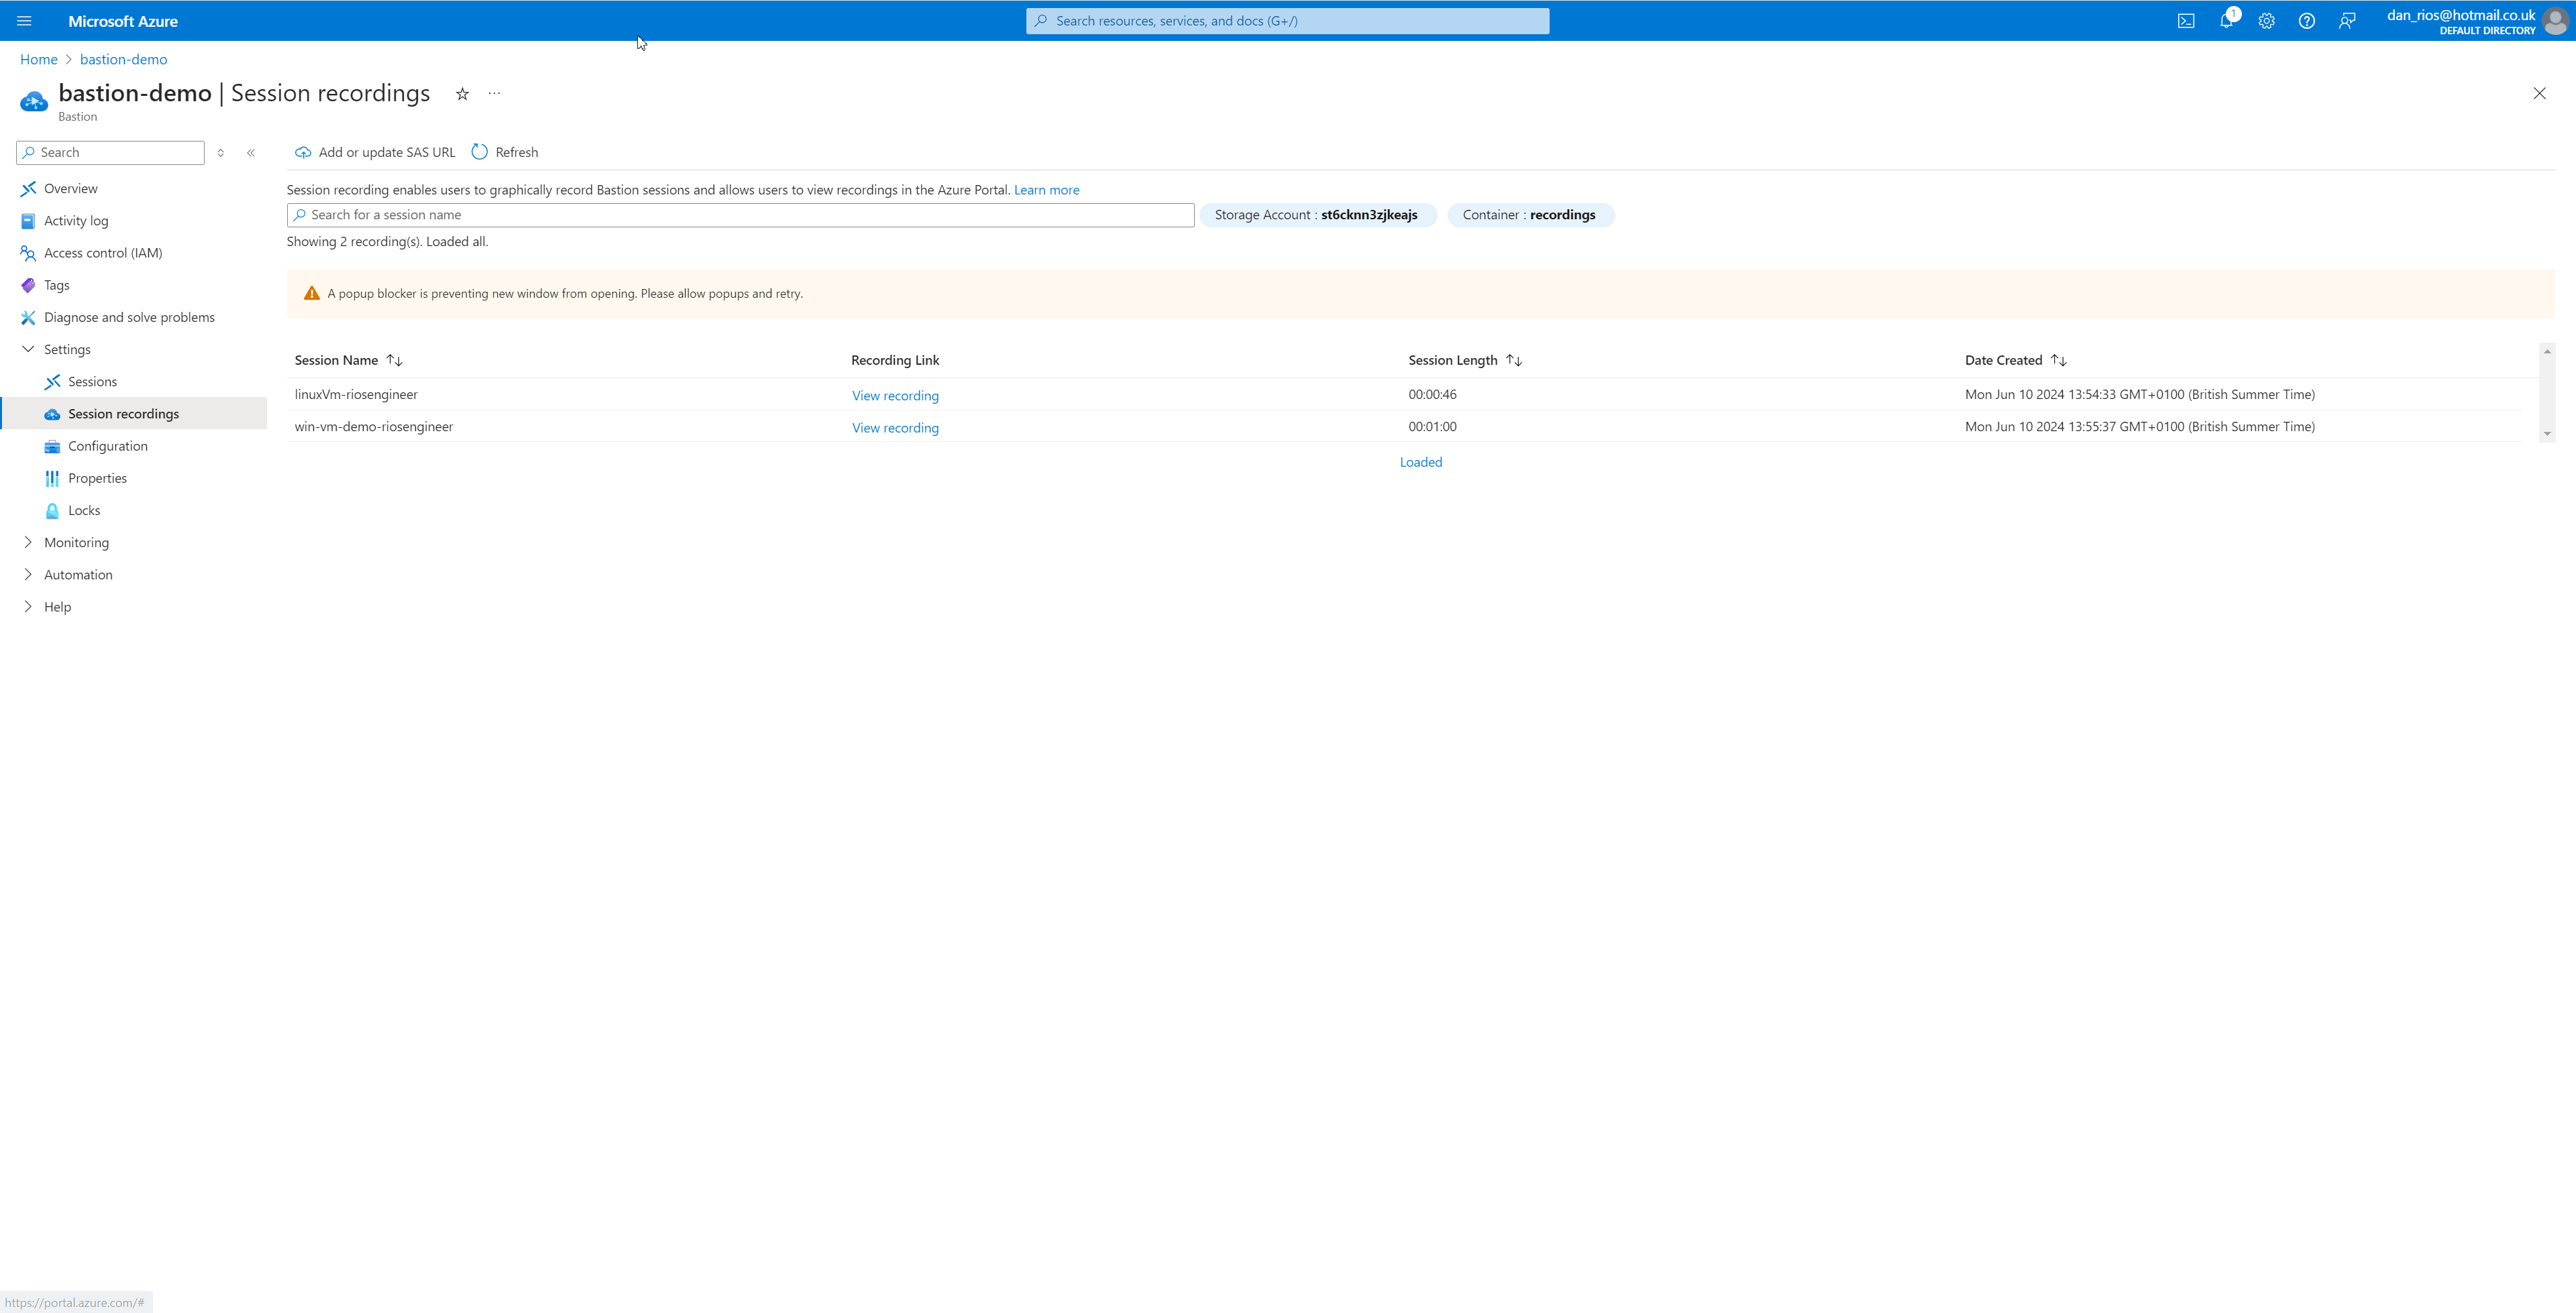
Now that everything is set up, simply log in to the Virtual Machines using Azure Bastion, and the session recording will automatically start, saving directly to the Storage Account. In my example below, you will find two recordings for each deployed VM: one for RDP and one for SSH:
Bastion session recording history
These uploads are very quick to appear, once the Bastion connection finishes. It’ll show the audit history with the name, which is the virtual machine, a link to view the recording, session length & date created.
Here’s a GIF on what clicking on the ‘View recording’ hyperlink looks like:
Ubuntu Session recording playback
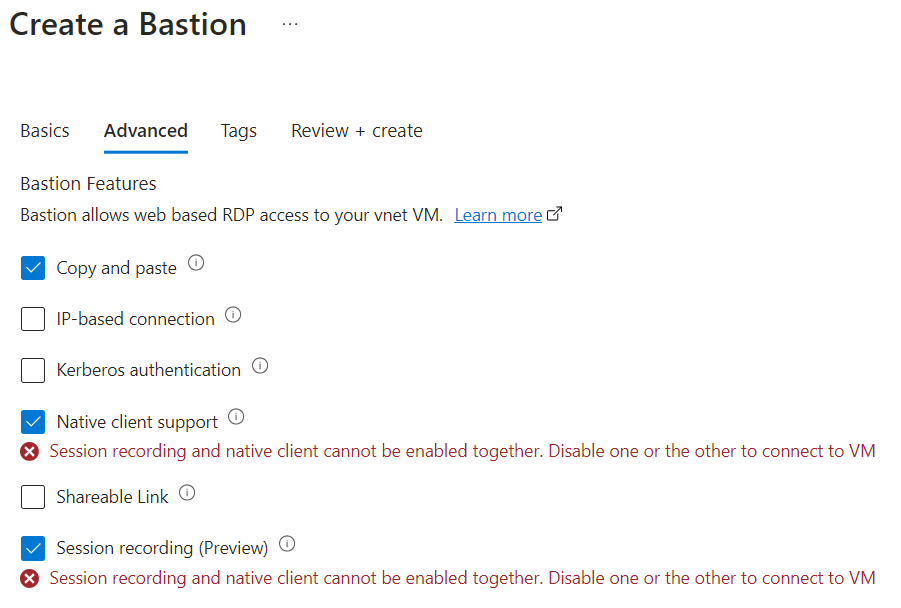
While exploring deployment options, I encountered a limitation regarding native client support and session recording as of the time of writing:
Bastion session recording limitation
Conclusion
To conclude, I think this is a really welcomed and long anticipated addition to Bastion, under the new Premium SKU. With recordings now uploading to a blob container, organisations can implement lifecycle management and archive recordings as needed, aligning with their specific requirements.
Bastion session recording will help to bring Bastion to the forefront as a solution for organisations who have stricter compliance, regulatory and sensitive workloads as the go-to native tooling.
Moreover, the Premium SKU’s introduction of private-only Bastion access via a private IP further solidifies its security benefits.
I’m curious to hear everyone’s thoughts on the session recording feature. What do you think?
2 thoughts on “Compliance with Azure Bastion: Session recording”
Hi Dan, we’re reviewing the recording feature but have encountered an issue. The recording happen (allegedly), and we can see the recordings in the storage account (they are about 3MB per minute of sessions).
However, when we click the “view recording” link, the recording opens in a new window, but it doesnt play. I’ve tried downloading the files and playing them with VLC, but it doesn’t recognize the file format.
Any idea what could be wrong here? As it’s still not GA I don’t suppose we can get help from Microsoft support to troubleshoot? 🙁 It’s really annoying, as this is a feature we’ve really been dieing to test – but as of right now, we can’t really use it for anything 🙁
Thanks.
Did it ever work for you (the playback of the session recording)? When testing, the playback from clicking the ‘view recording’ link would play directly within Microsoft Edge for me, so I had no real need to use VLC etc. Are you using Edge too?
The technical storage or access is strictly necessary for the legitimate purpose of enabling the use of a specific service explicitly requested by the subscriber or user, or for the sole purpose of carrying out the transmission of a communication over an electronic communications network.
Preferences
The technical storage or access is necessary for the legitimate purpose of storing preferences that are not requested by the subscriber or user.
Statistics
The technical storage or access that is used exclusively for statistical purposes.The technical storage or access that is used exclusively for anonymous statistical purposes. Without a subpoena, voluntary compliance on the part of your Internet Service Provider, or additional records from a third party, information stored or retrieved for this purpose alone cannot usually be used to identify you.
Marketing
The technical storage or access is required to create user profiles to send advertising, or to track the user on a website or across several websites for similar marketing purposes.


Hi Dan, we’re reviewing the recording feature but have encountered an issue. The recording happen (allegedly), and we can see the recordings in the storage account (they are about 3MB per minute of sessions).
However, when we click the “view recording” link, the recording opens in a new window, but it doesnt play. I’ve tried downloading the files and playing them with VLC, but it doesn’t recognize the file format.
Any idea what could be wrong here? As it’s still not GA I don’t suppose we can get help from Microsoft support to troubleshoot? 🙁 It’s really annoying, as this is a feature we’ve really been dieing to test – but as of right now, we can’t really use it for anything 🙁
Thanks.
Hey Nicolai,
Did it ever work for you (the playback of the session recording)? When testing, the playback from clicking the ‘view recording’ link would play directly within Microsoft Edge for me, so I had no real need to use VLC etc. Are you using Edge too?
Dan