Introduction – Private Azure DevOps agent
If you’re using Azure DevOps as your source control and deployment tooling, you may need to perform CI/CD to Azure resources that have no public access and are on private endpoints. This can pose a particular challenge, as unlike GitHub private runners, which can natively run within the private Azure virtual network, Azure DevOps relies on self-hosted agents to run on Azure compute (see blue note below as an update on this!).
This solution comes in a few flavours, but the default for many organizations is a virtual machine with the private Azure DevOps self-hosted agent registered on it. However, there are other ways to achieve this without the need for a virtual machine, aligning more closely with a cloud-native approach.
Using serverless resources such as Azure Container Instances (and for that matter, Azure Container Apps and Azure Kubernetes Service are viable options too), you can achieve the same result without needing to manage a virtual machine. Some obvious benefits of this approach are lower costs and much lower management overhead, as you no longer need to manage an OS in its entirety.
In this post, I will provide a full end-to-end walkthrough on how to create, register, and deploy to private Azure resources, including a full demo lab setup for you to test yourself with a sample .NET application and Azure DevOps deployment pipeline. This will also deploy all Azure resources required via Azure Bicep!
This will make this process below seamless and a lot easier to implement. However, this article offers a serverless, cost effective approach, including insights into private Azure Container Registries, private networking and other challenges that can be overcome that aren’t specific to ADO.
You can read more on that announcement here.
High Level Architecture
Before we begin diving any deeper, let me go over the high level Azure architecture with a simple drawing to depict what this solution is and how it plugs together to achieve this:
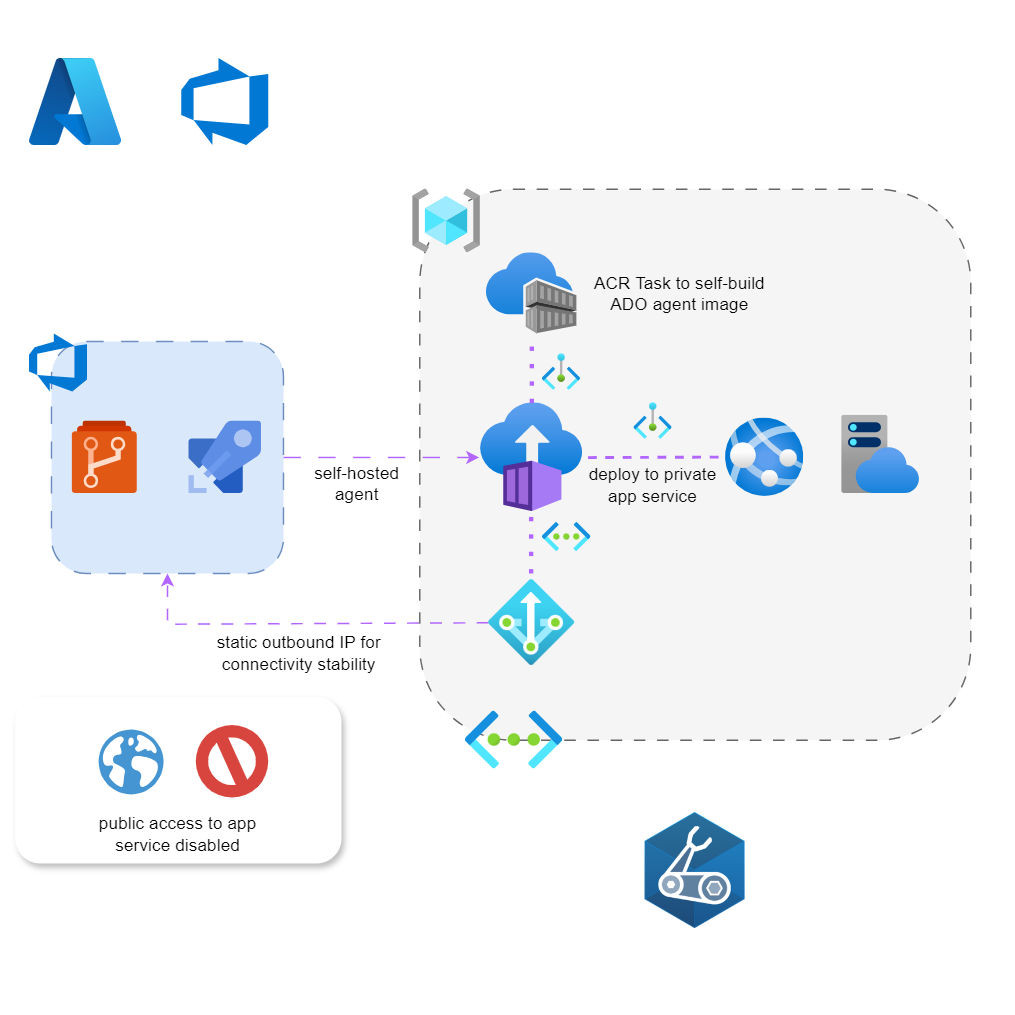
As you can see, all resources are on private endpoints within the virtual network address space, including the Azure Container Registry, which has disabled network access, no admin user enabled, and is on a private endpoint. In addition, the GitHub lab includes a sample .NET web application that is entirely private to demonstrate deployment, as mentioned above.
Lastly, there is a NAT Gateway resource to provide the Azure Container Instances with reliable connectivity to Azure DevOps. More details on all these components and why they’re necessary are provided further down.
The challenges of a private Azure Container Registry
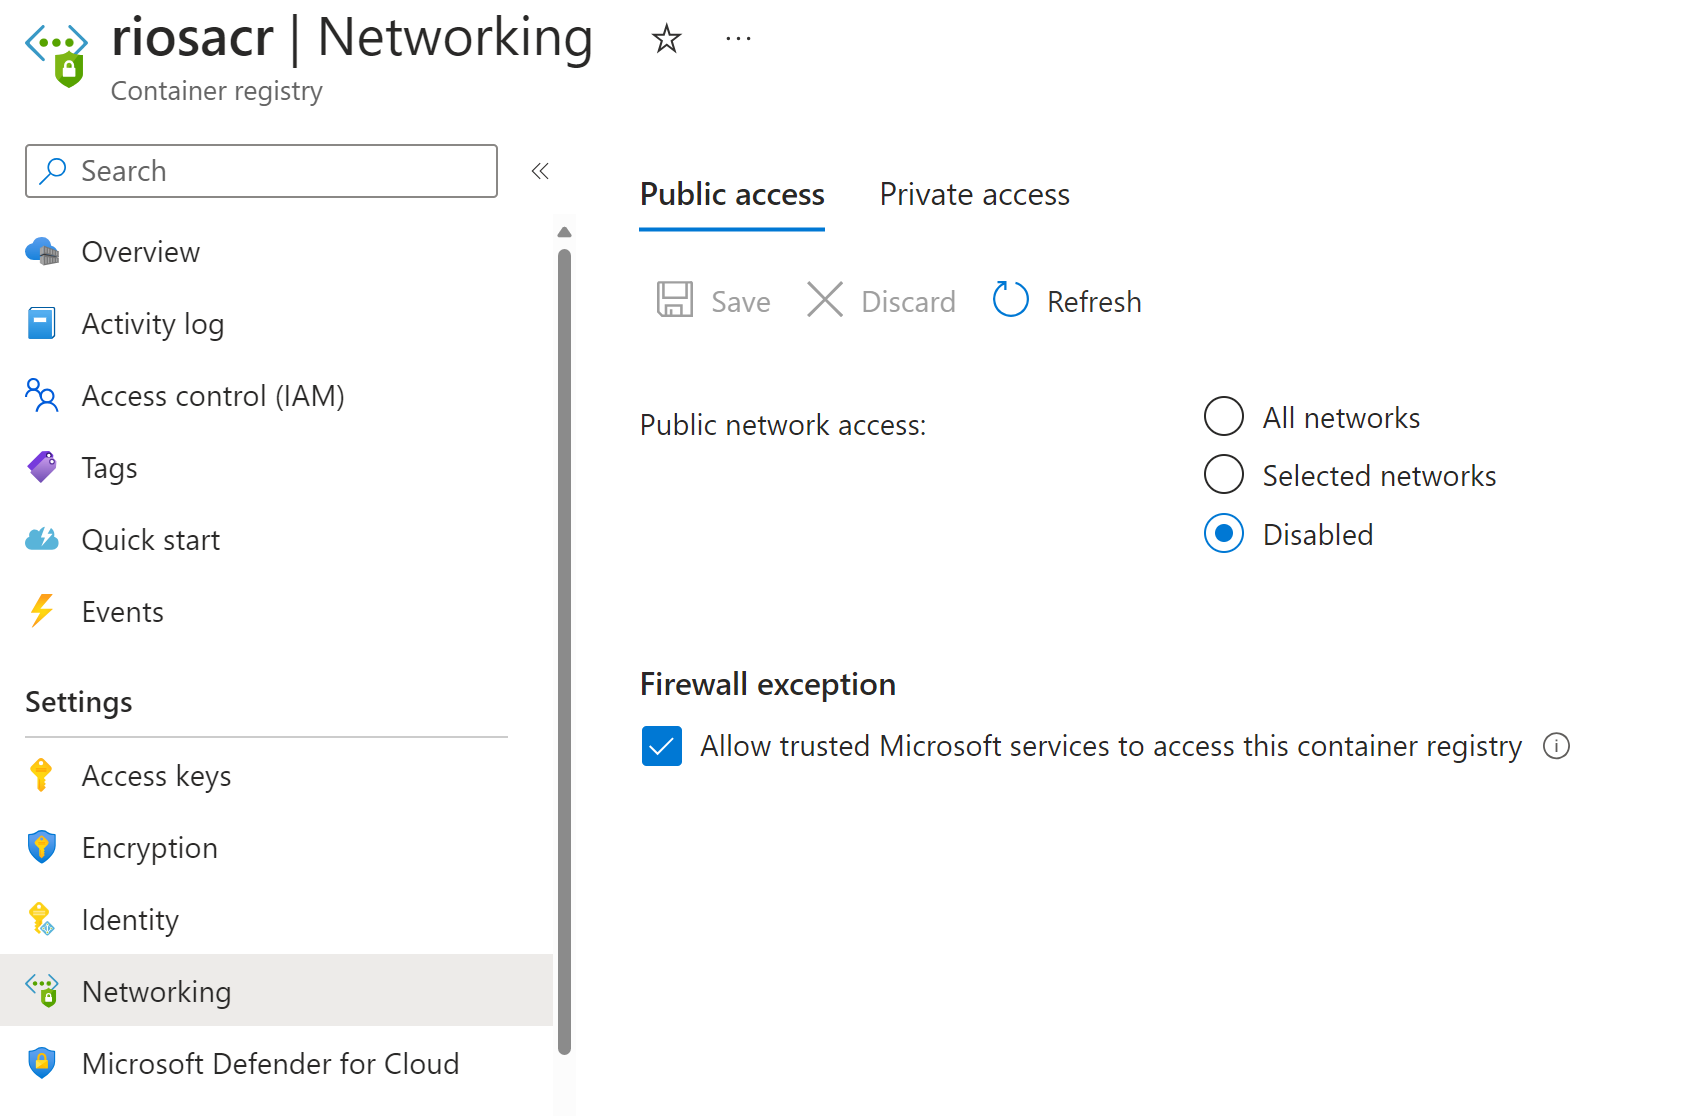
If you want an ACR with no admin account, public access disabled, and on a private endpoint, you will find that you cannot pull or push an image to the ACR. This is because when you disable public access on an ACR, you encounter several limitations, including not being able to log in to the registry from Azure DevOps or Azure CLI, and not being able to view or list the repositories. You are solely reliant on ‘trusted’ Azure services, of which there are a limited number. See: https://learn.microsoft.com/en-us/azure/container-registry/allow-access-trusted-services. You can view the limitations in full here:
https://learn.microsoft.com/en-us/azure/container-registry/container-registry-private-link
To push an image to the private ACR, you can utilise an ACR Task. You can trigger the task on commit/pull requests to build the image within the ACR context (rather than Azure DevOps pipelines), and it will automatically push it via managed identity to the ACR.
Here’s also a good blog on the subject if you’re interested:
Problems with Protecting Azure Container Registry – Azure Talk (zuehlke.cloud)
Resource breakdown
What will this template and demo deploy?
- Two resource groups: Web App & ADO Components
- Azure Container Registry: With Private Endpoint and Private DNS Zone
- Azure Container Instance: Integrated into the virtual network
- User-managed identity
- NAT gateway: With public IP associated
- Virtual Network and NSG: With 3 subnets – web app, private endpoint, and Azure DevOps agent subnet
- App Service: On a Private Endpoint with a Private DNS Zone
The reason for using a user-managed identity is to enable authorisation across resources via RBAC. With a system-assigned identity, it would be impossible to pull everything together during Bicep runtime, and I needed a way to deploy this repeatedly for a lab scenario.
The App Service is entirely private, allowing you to test deploying to a private resource in Azure. It has no public access and is on a private endpoint.
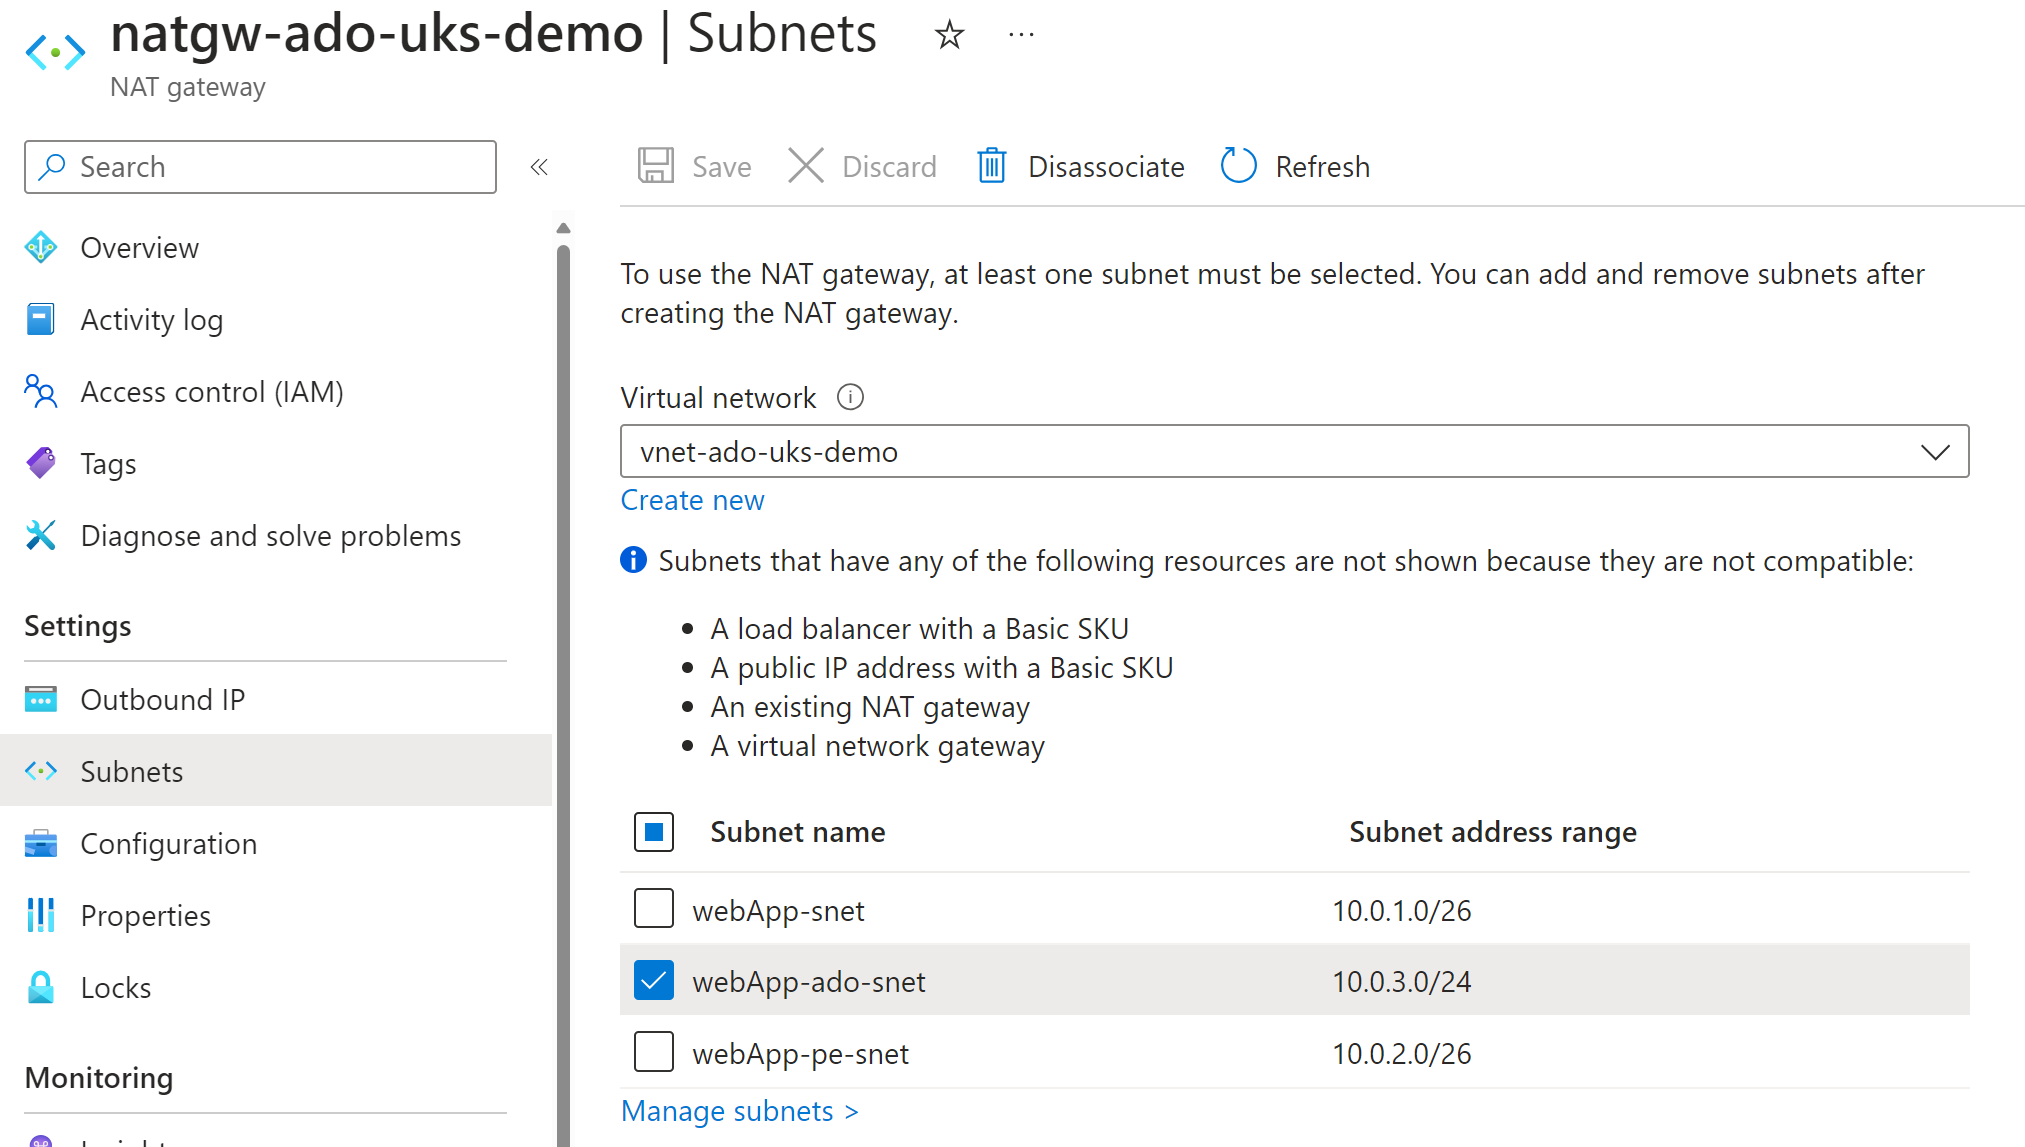
The rationale behind including a NAT gateway for the ADO subnet is that, without it, the Azure DevOps self-hosted agent would be very unreliable in terms of connectivity. I needed a single source IP to originate the outbound calls.
In this demo, I’ve associated the subnet where the Azure Container Instance is placed so it can originate traffic from the public IP of the NAT gateway resource. This is all deployed from the Bicep template.
.NET Demo App
For the sake of the proof-of-concept/lab demo, I needed a very simple .NET app that we can build and deploy to the App Service via the Azure Container Instance to prove the end-to-end solution. The .NET app is a simple hello-world style static web page. This is compiled, built, and deployed via the provided Azure DevOps pipeline in the repository deploy-app.yaml.
Deployment prerequisites
There are some prerequisites that need to be set up ahead of the main demo, which I assume you are already using if you’ve come across this article. If you’re following the GitHub repository lab, you’ll want the GIT repository to be new/empty so you can clone the contents into it.
- Azure DevOps Project
- Azure subscription to deploy into
- Azure DevOps Service Connection (workload federation identity strongly recommended) that has access to your Azure subscription
- Familiarity with GIT
If you need help, feel free to leave a comment on this article or reach out on LinkedIn, and I will do my best to assist you!
Azure DevOps Setup
Personal Access Token
To enable the ACR Task & Agent registration, you’ll need a token from your personal Azure DevOps account. Trust me, I don’t like this either, but at the time of writing, I am struggling to find a way to do this via a managed identity/SPN – it doesn’t seem to be an available feature yet or documented anywhere I could find.
You can use an SPN/MI for agent registration, but this seems to have limitations with ACI. Let me know in the comments if you’re aware of a way for this to work.
In your Azure DevOps project, click the user cog button at the top right (https://dev.azure.com/yourorg/_usersSettings/tokens) > Personal Access Tokens > New Token with these permission scopes:
- Code: Read
- Agent Pools: Read & Manage
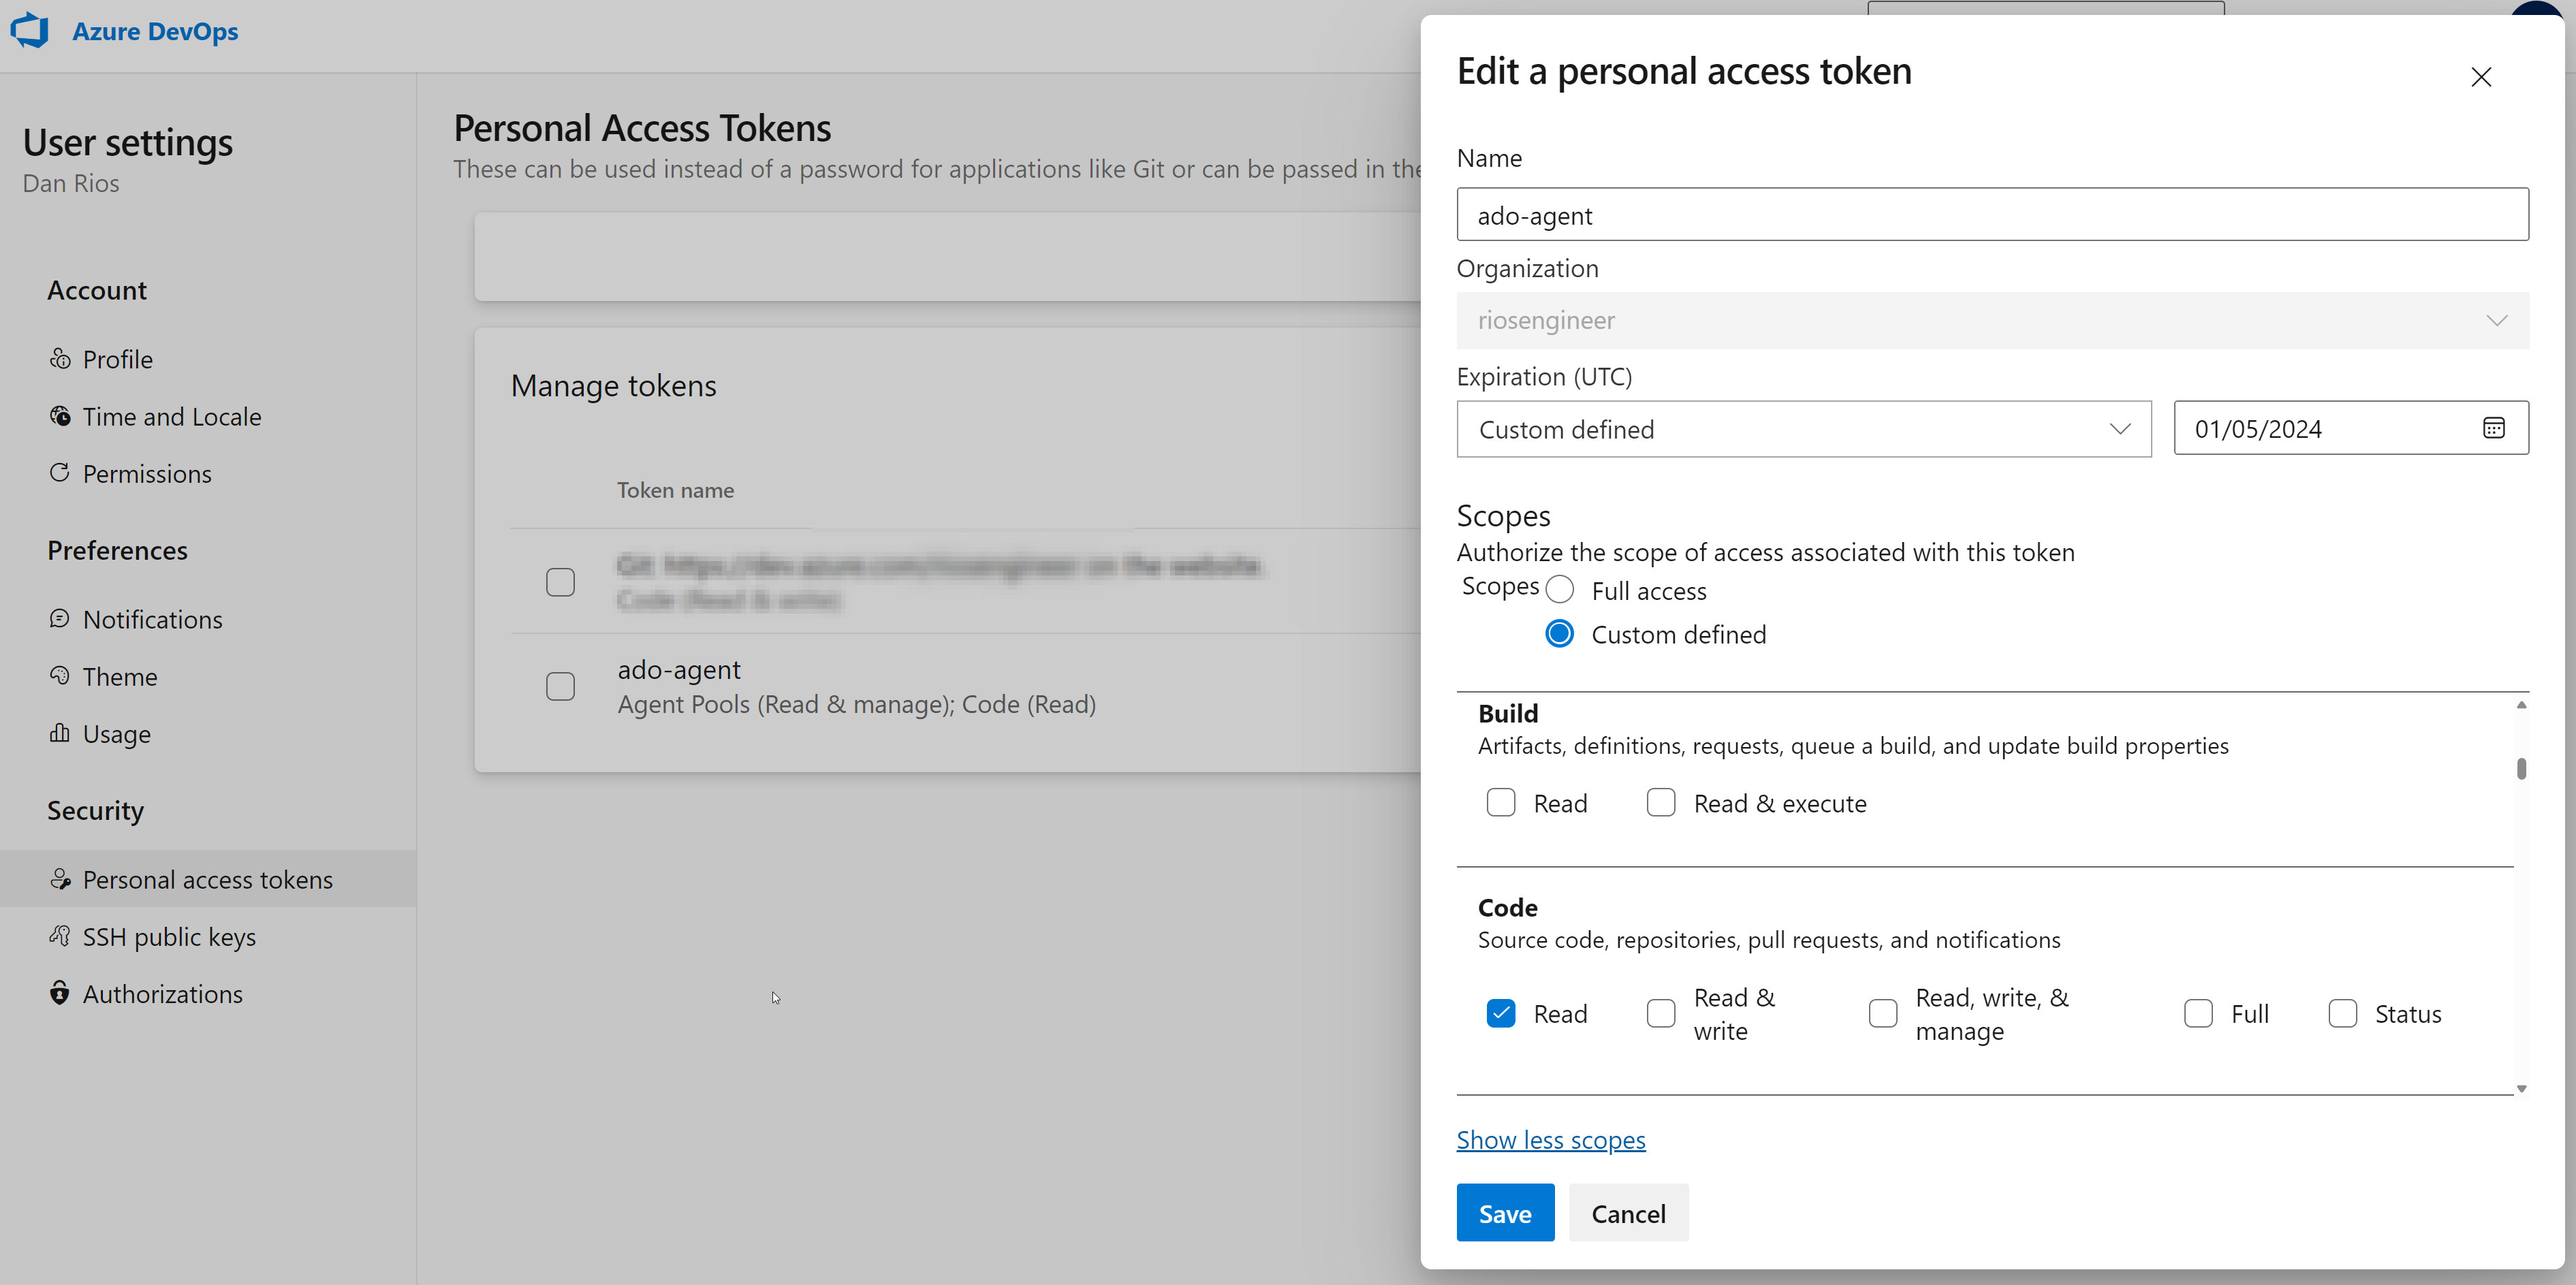
Give it a name and set an expiration date. The ACR Task run depends on this token, which is far from ideal. I would recommend monitoring the expiration or setting up some automation to rotate it frequently based on your organisational needs.
Additionally, I would suggest separating the tokens because the agent is only needed for registration to ADO and is not required thereafter. Disclaimer: This simplifies the demo for ease of following, but it illustrates the concept I’m aiming for here 🙂
Agent Pool
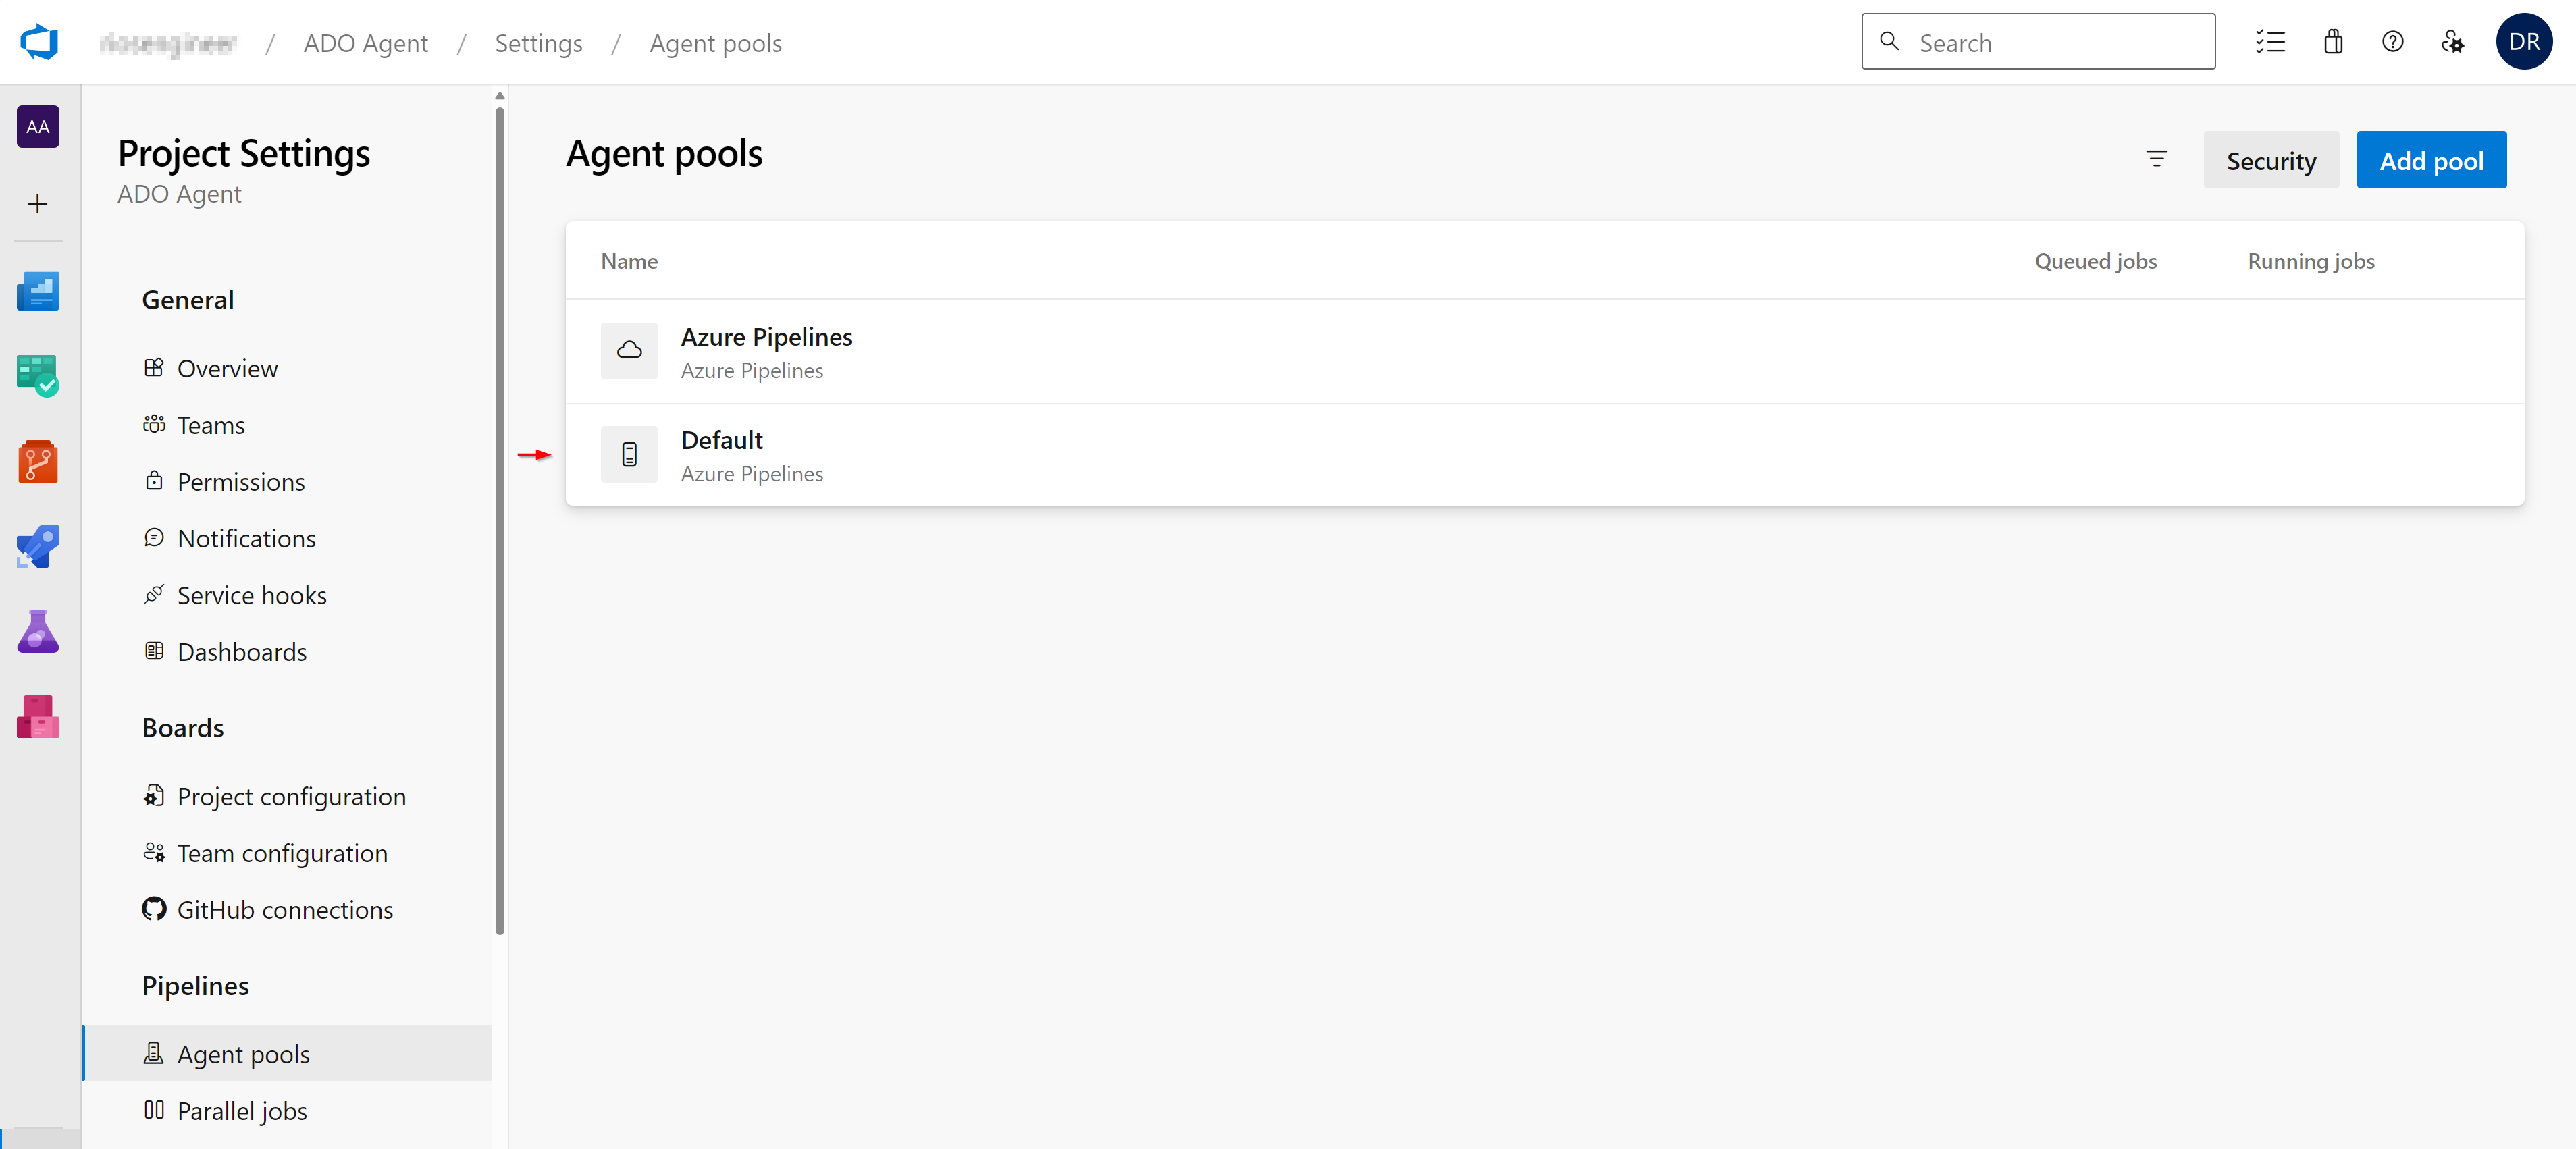
I’m using the agent pool group called ‘Default’, which is automatically created in your ADO project for registering the self-hosted agent. If you prefer to use a different pool, ensure it’s created and adjust the deploy-app.yaml file where the pool requirements are specified (see below for more information).
Clone Repo
To clone the repo from the public GitHub repository into a private ADO project, go to Repos > Files > Import a Git repository and paste the GitHub URL: https://github.com/riosengineer/lab-ado-agent-in-aci-private-acr-appdeploy
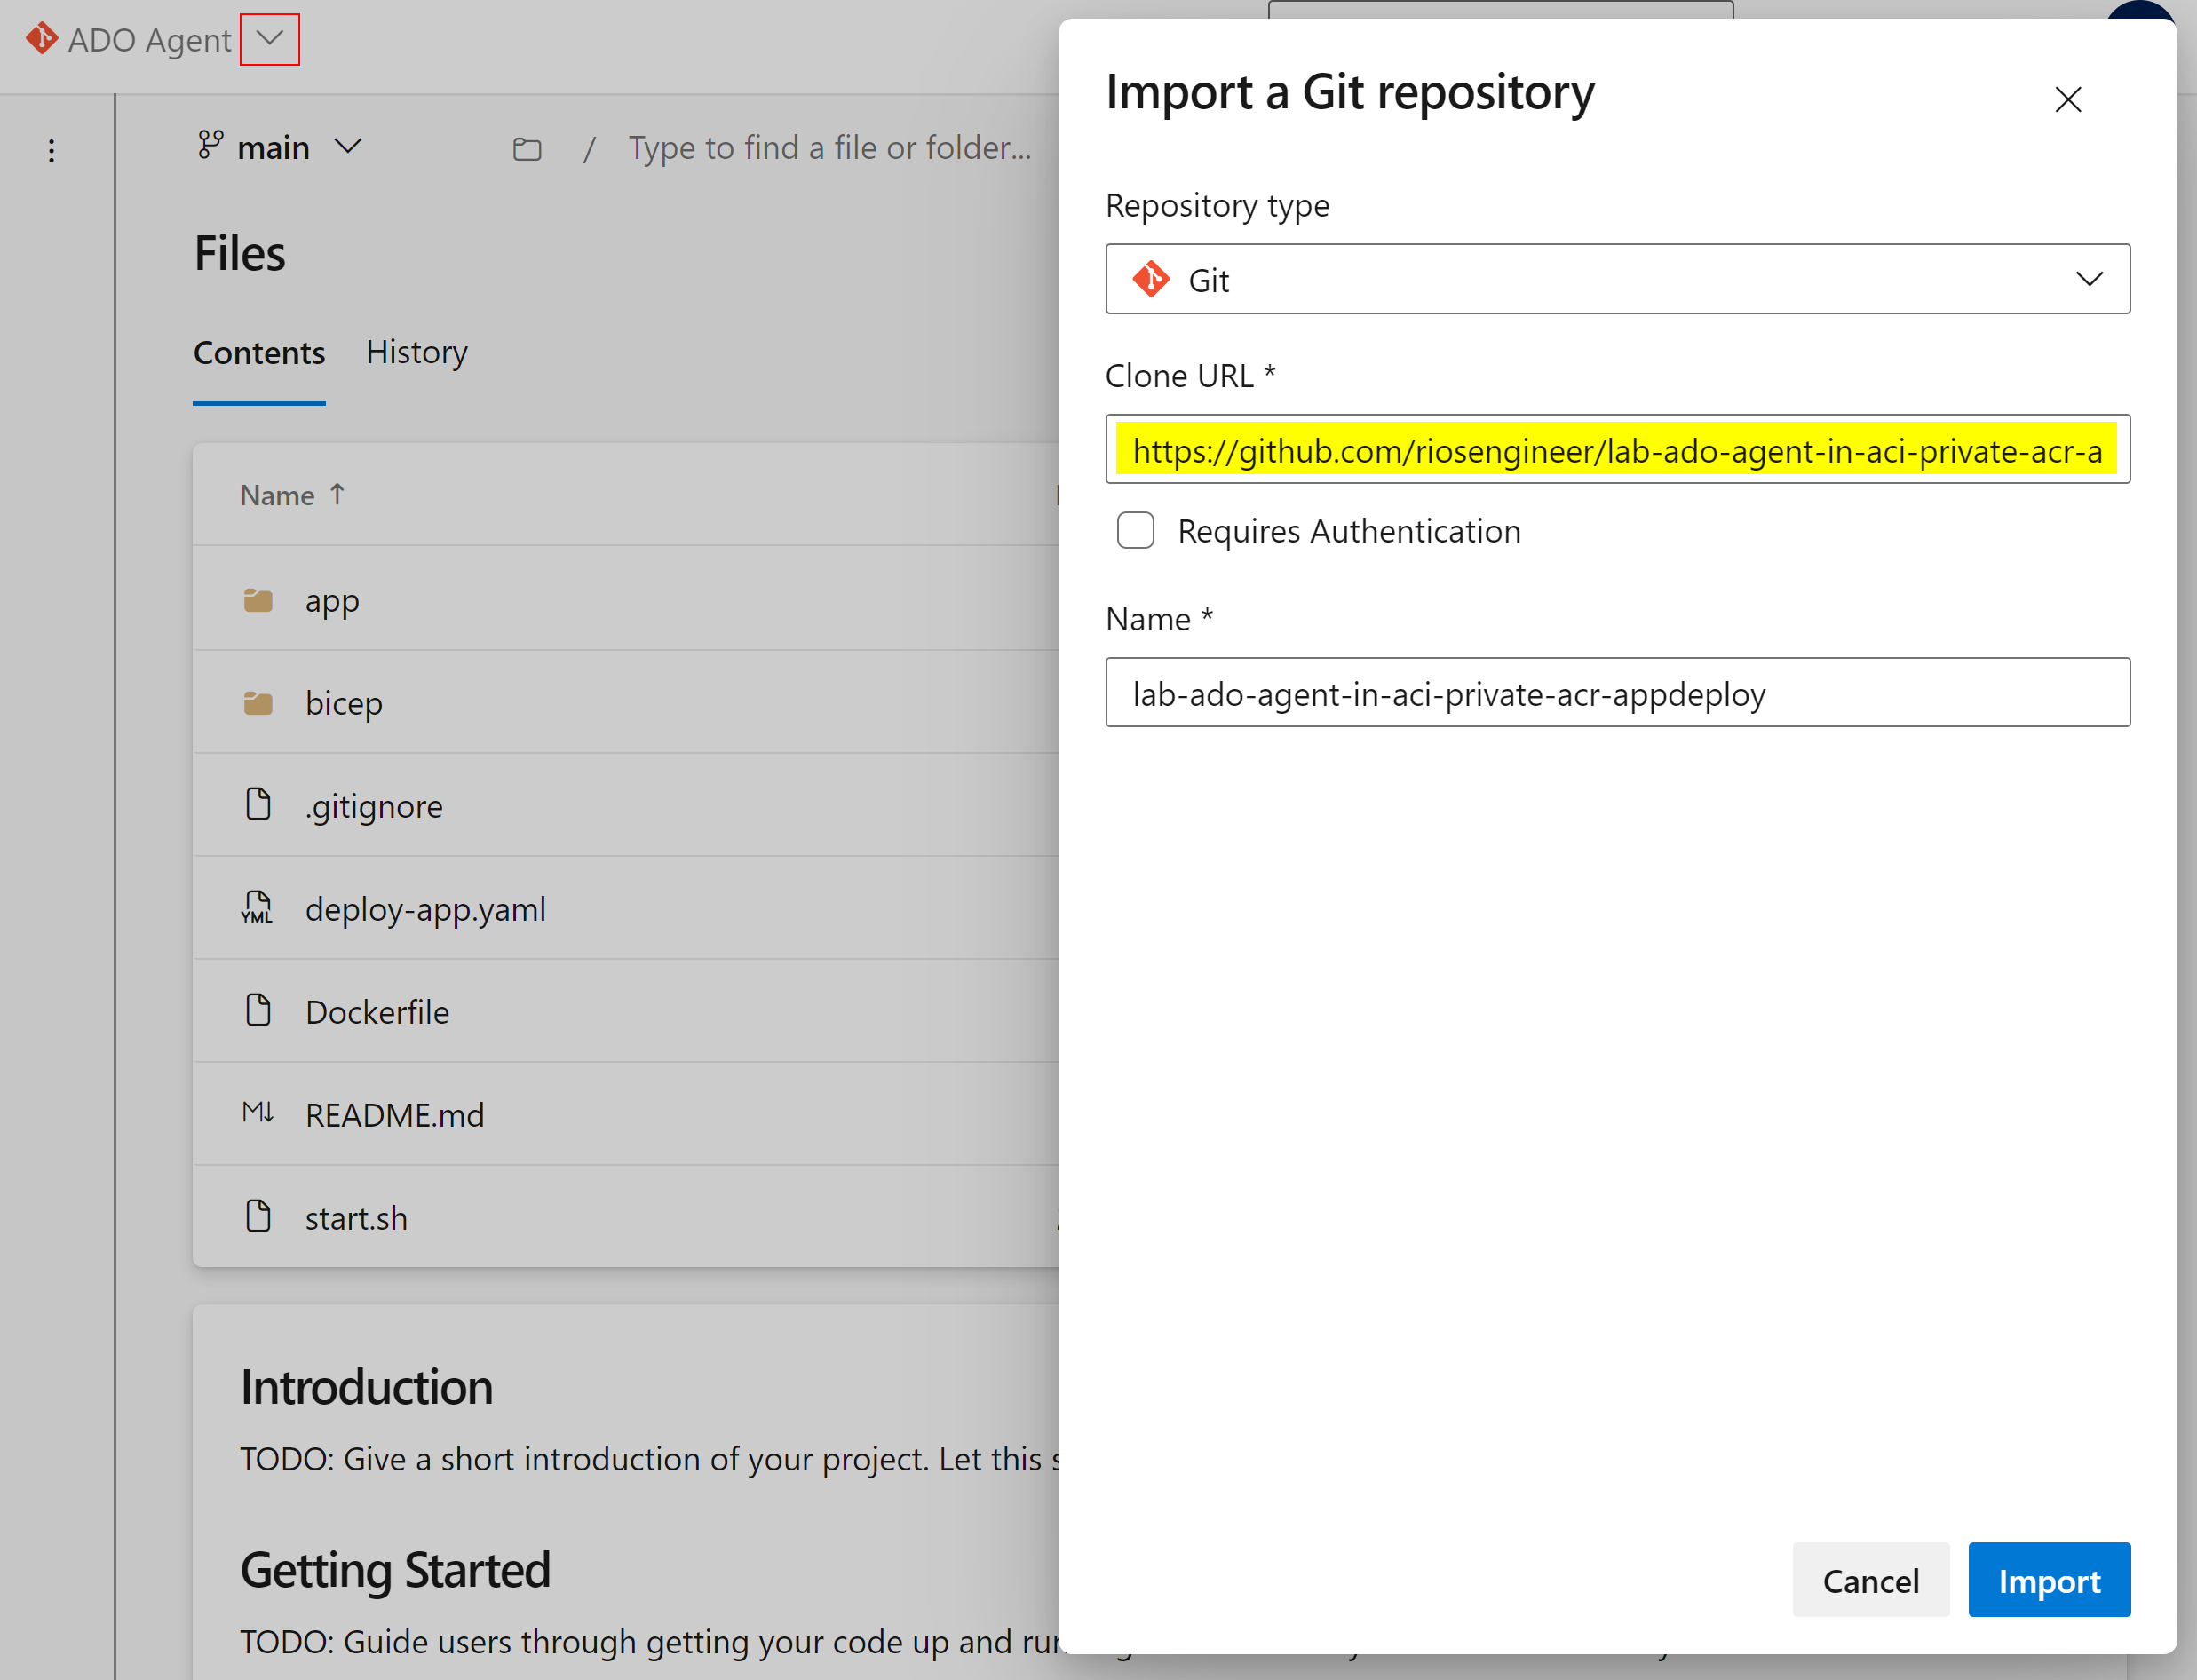
Simple as that.
App Deployment Pipeline
Since the repository is cloned into Azure DevOps, you can now create a new pipeline for deploying the app using the existing YAML pipeline file.
Pipelines > New pipeline > Azure Repos Git > YourRepo > Existing Azure Pipelines YAML File > Select deploy-app.yaml from the dropdown list
I’ve added comments in the YAML file on sections where you’ll need to update your service connection names in the variables YAML from your project connections:
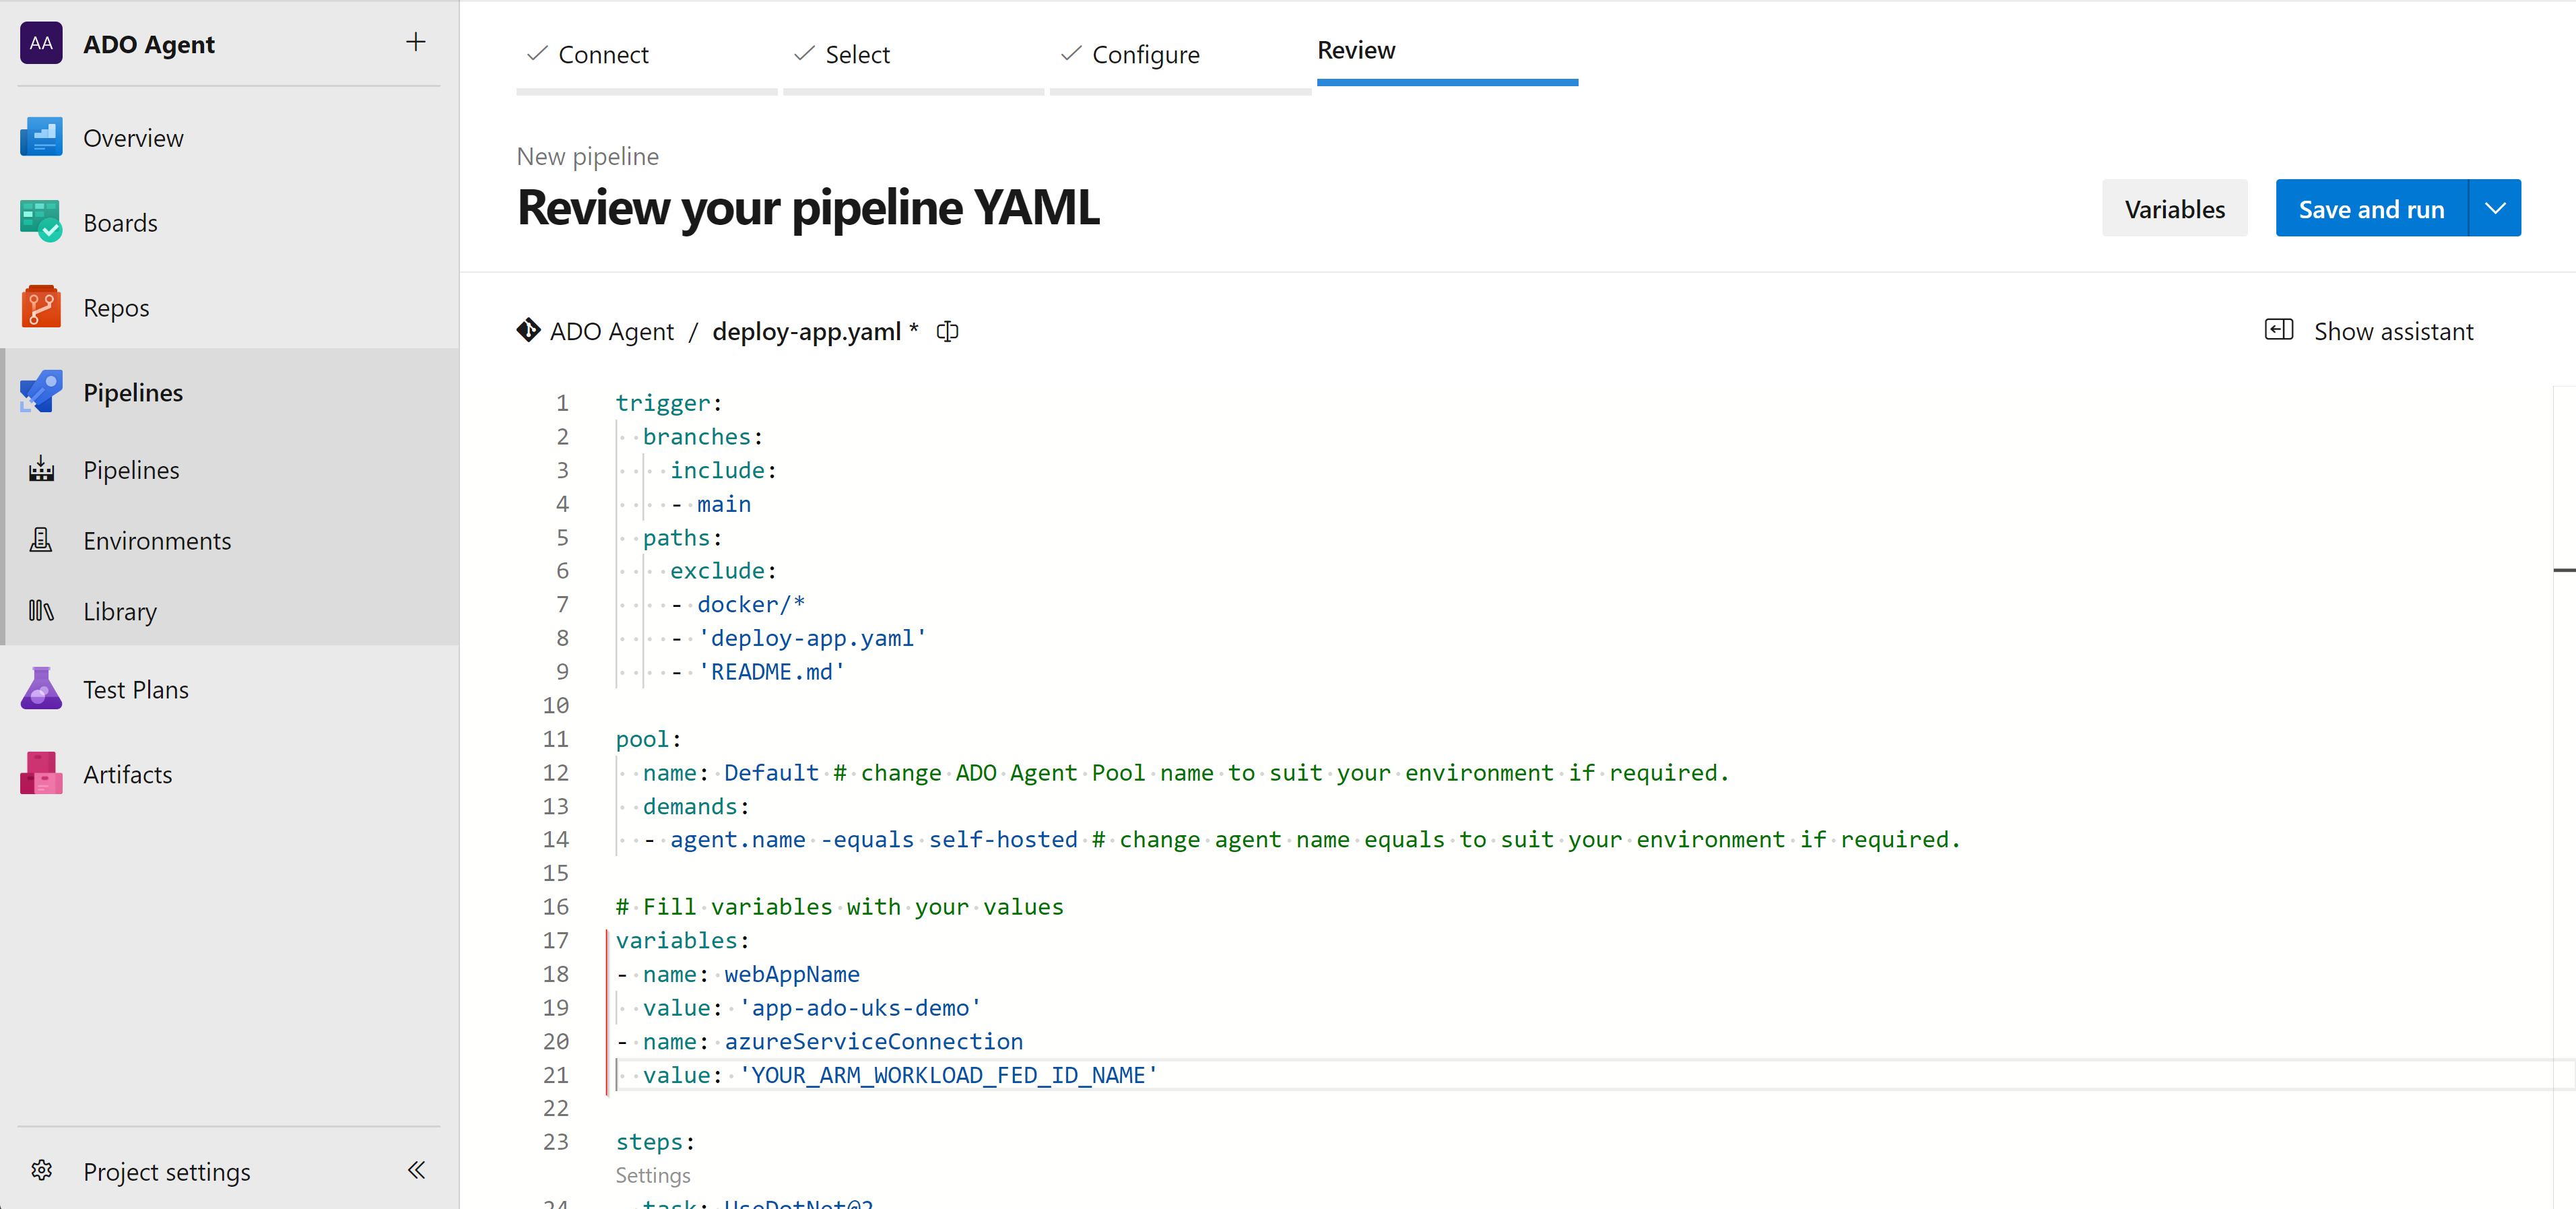
Continue > Save to complete.
Deployment – Azure resources via Bicep
Firstly, you’ll need to deploy the Azure resources from the provided Bicep template. Make sure to adjust any parameters to fit your specific deployment requirements in the main.bicepparam file beforehand.
// ADO Agent
param AZP_NAME = 'self-hosted'
param AZP_POOL = 'Default' // Leave this value unless you're editing the modules to change the pool name
param AZP_TOKEN = 'YOUR_ADO_PAT' //
param AZP_URL = 'https://dev.azure.com/YOUR-ADO-ORG-HERE'
param aciImage = 'mcr.microsoft.com/azuredocs/aci-helloworld:latest' // change this on second deployment pass.
// placeholder public image. Change parameter to: ${acrName}.azurecr.io/ado-agent:latest on second deployment pass
// Git Repo
param gitRepoUrl = 'https://dev.azure.com/YOUR-ADO-ORG-HERE/YOUR-ADO-PROJECT-NAME/_git/REPO-NAME#main' // change hashtag for different branch for ACR task
With container instances to deploy you have to deploy a public image, hence the reason I’m using a generic popular dockerhub ADO agent image to initially create the ACI as a placeholder. This allows all resources in Azure to be created initially.
Later, after running the private Azure Container Registry (ACR) task, you can redeploy the template with an updated ACI image path pointing to your private ACR to update the instance.
Simply deploy using the following Azure CLI command from your VS Code terminal (enter your Personal Access Token (PAT) when prompted in the terminal):
az deployment sub create -l uksouth -n deploy -f main.bicep -p main.bicepparam -p AZP_TOKEN=YOUR_ADO_PATDocker Build
For example, {{.Run.ID}} which will tag with the latest ACR Task run id, more in the Az CLI example here. I have left a comment in the acrTasks.bicep template as well on this.
As mentioned earlier, due to the private nature of the ACR with no public access and on a Private Endpoint we cannot login to the ACR or use DevOps pipelines to orchestrate the docker build of the Azure DevOps self-hosted agent. Therefore, we need to leverage an ACR Task that will do the build for us, using managed identities.
The ACR Task should also trigger on commits to the private Azure DevOps repository and automatically run. This gives you a similar CI/CD pipeline workflow via an ACR Task instead of the ADO pipeline mechanism.
Because the ACR Task has a commit trigger, any changes to the dockerfile (add a comment to the file for the sake of demo purposes) will trigger the ACR Task to pull and build from your Azure DevOps repository (yes I have blurred the gazillion failures in an attempt to hide my testing failures 😆):
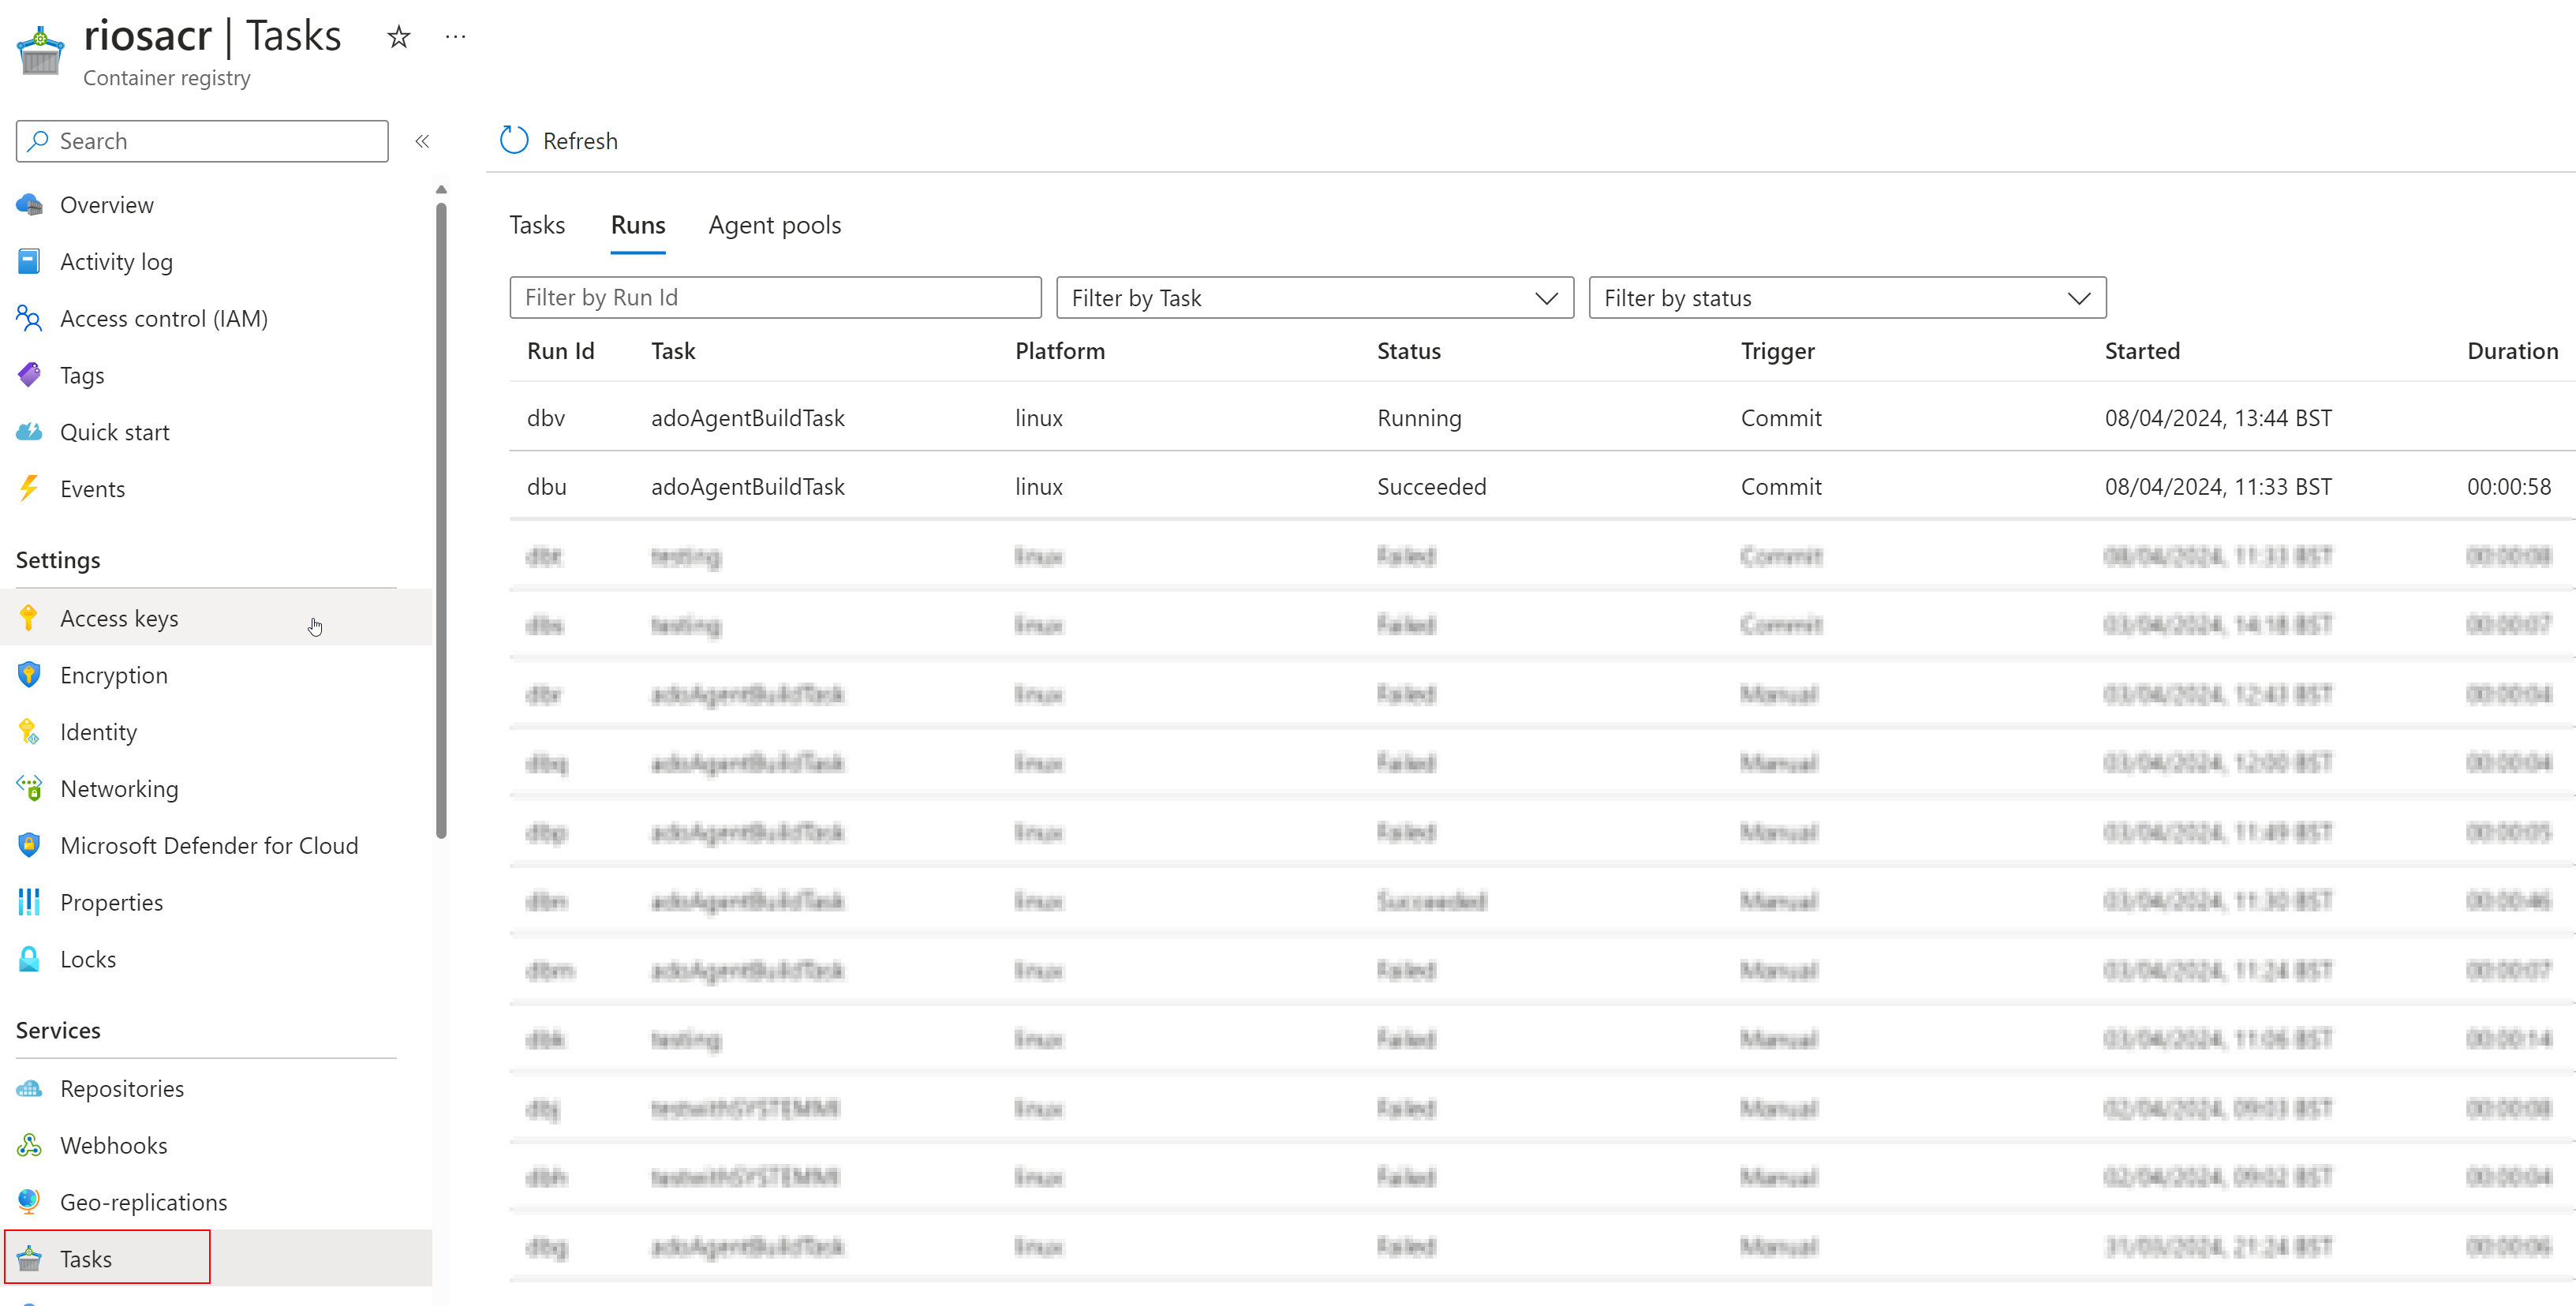
This trigger will be useful going forward. If you want to add dependencies, packages, etc into your agent then this will facilitate you to do so from your ADO Git repository and the ACR Task will update the image on commit. However, do note if you want this image to become live into the ACI you have to ‘redeploy’ with the updated image tag.
Pulling private Azure DevOps agent image to ACI
The last phase is to pull the newly built self-hosted agent image into the Azure Container Instance. Since the deployment has a user-assigned managed identity deployed and assigned with enough permissions, you can redeploy the Azure Bicep template to do this as the last stage.
Uncomment this section of code in aci.bicep within the modules folder:
imageRegistryCredentials:[
      {
        server: '${acrName}.azurecr.io'
        identity: userManagedIdentityId
      }
]And update the aciImage parameter in the main.bicepparam to the image that was created in the ACT Task docker build, as we can now deploy our private ACR image to the container instance. Like so:
CHANGE:
param aciImage = 'mcr.microsoft.com/azuredocs/aci-helloworld:latest'
TO:
param aciImage = '${acrName}.azurecr.io/ado-agent:latest'And redeploy using:
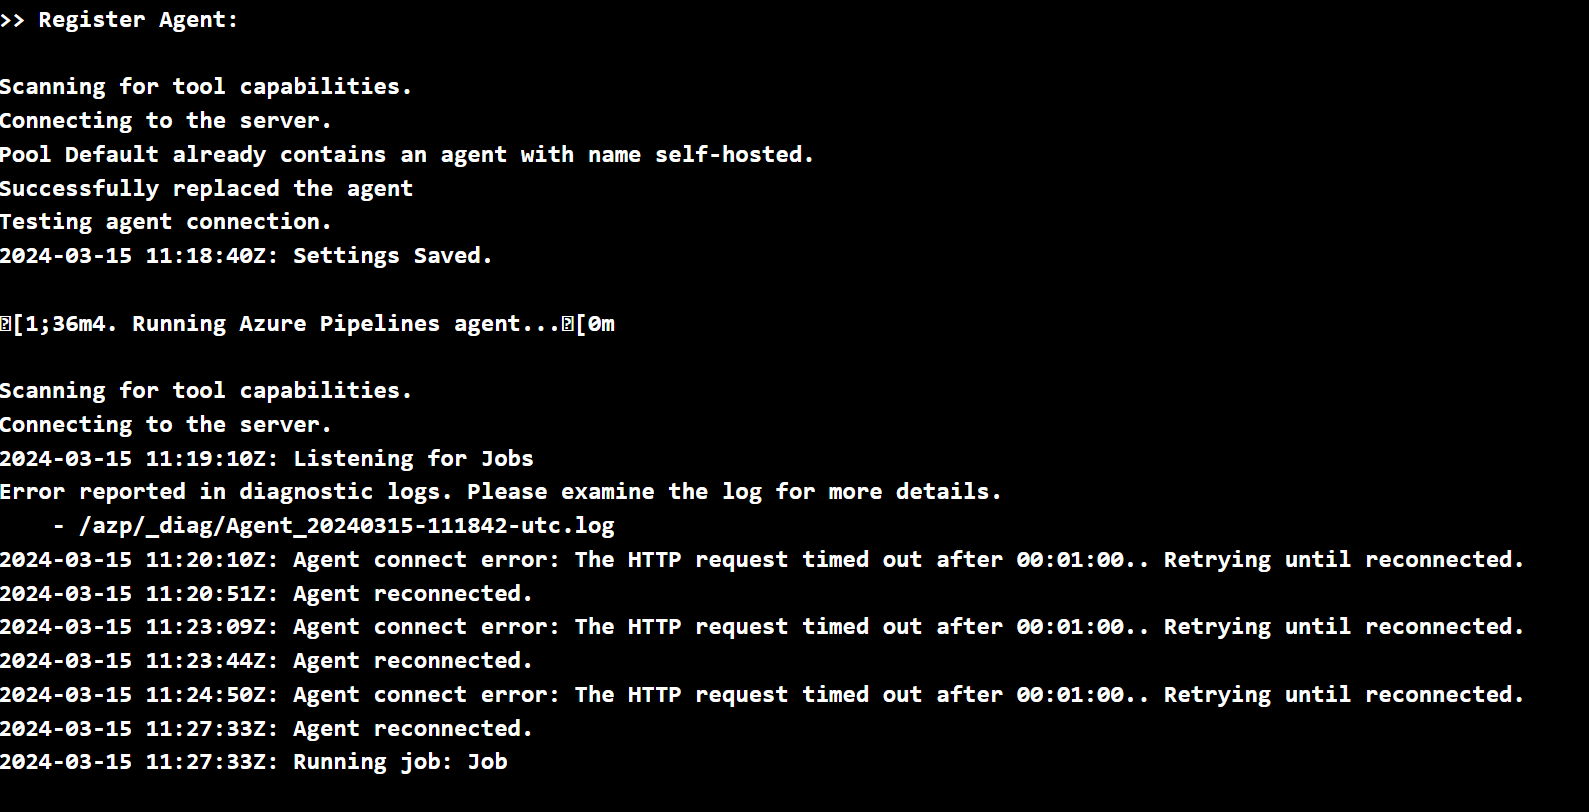
az deployment sub create -l uksouth -n deploy -f main.bicep -p main.bicepparam -p AZP_TOKEN=YOUR_ADO_PATOnce completed, the ACI will now have pulled the self-hosted agent image from the private ACR and configured this to be in our Azure DevOps pool ready for you to deploy with!
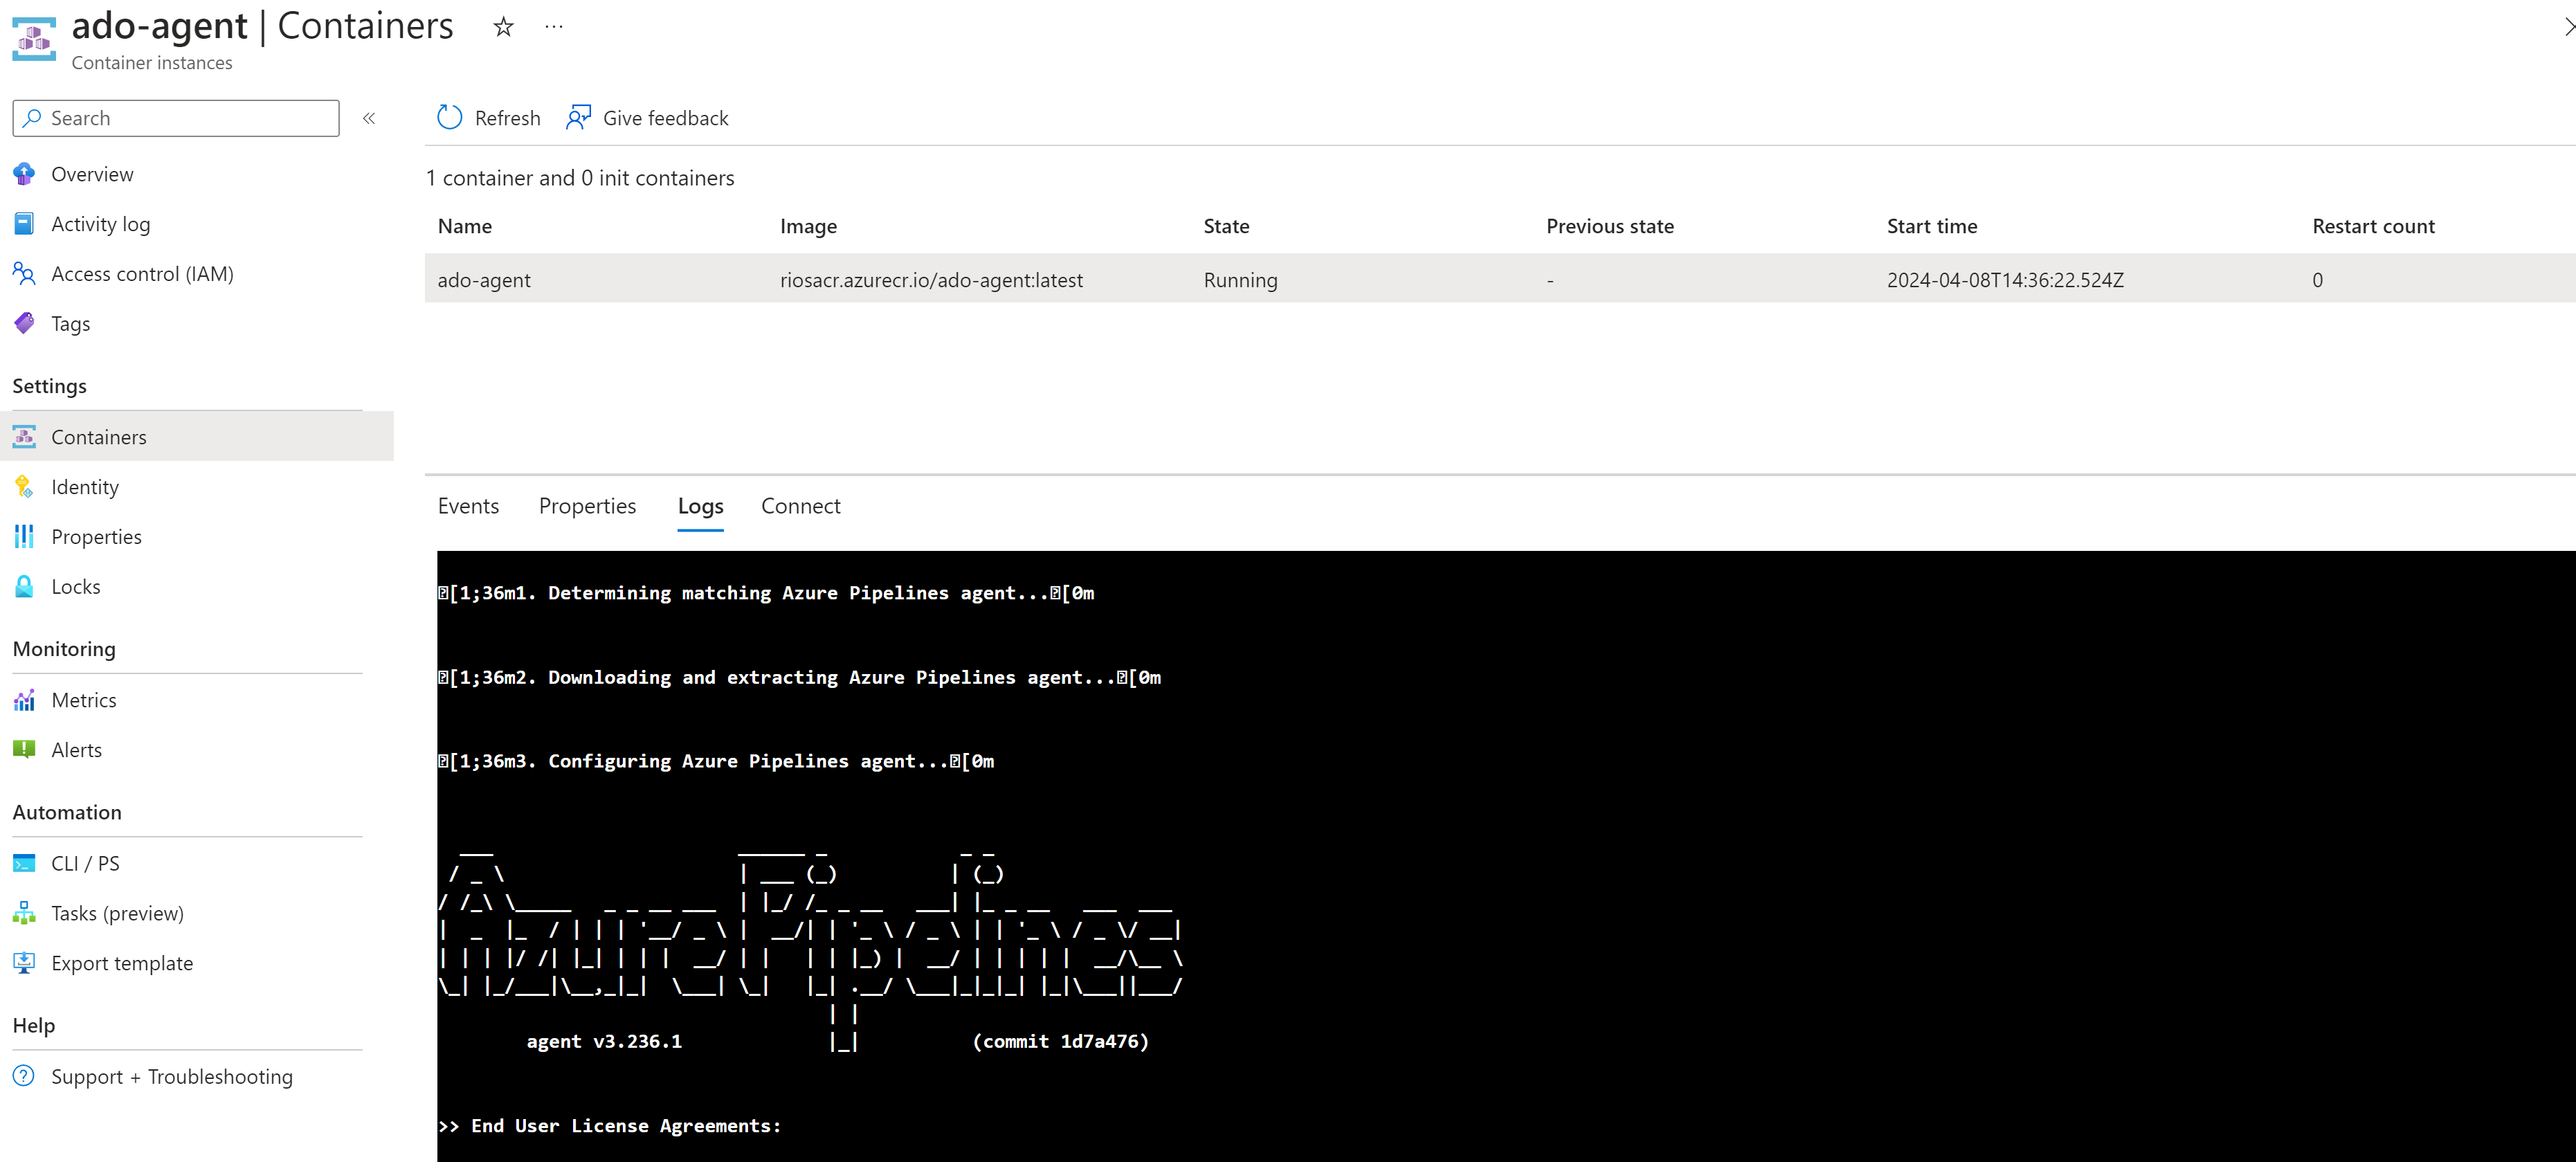
Deployment – Private App Service
The final part of this is to showcase that you can now deploy to any Azure resources in your environment that are on private endpoints using your private ACR self-hosted agent image via a virtual network-integrated ACI. In the final stage of this post, you’ll leverage the earlier mentioned .NET App with the pipeline created earlier on for deployment.
With the deploy-app.yaml using the agent as its compute to run on, you’ll be able to deploy to the private app service as our ACI is now originating from within the virtual network.
Navigate to your Azure DevOps project, then to Pipelines. Locate the deployment app pipeline created earlier and click ‘Run Pipeline’ to manually start the deployment. Alternatively, you can modify the homepage text (app/app-ado-uks-demo/Pages/Index.cshtml) and commit it to the repository to trigger the CI/CD pipeline.
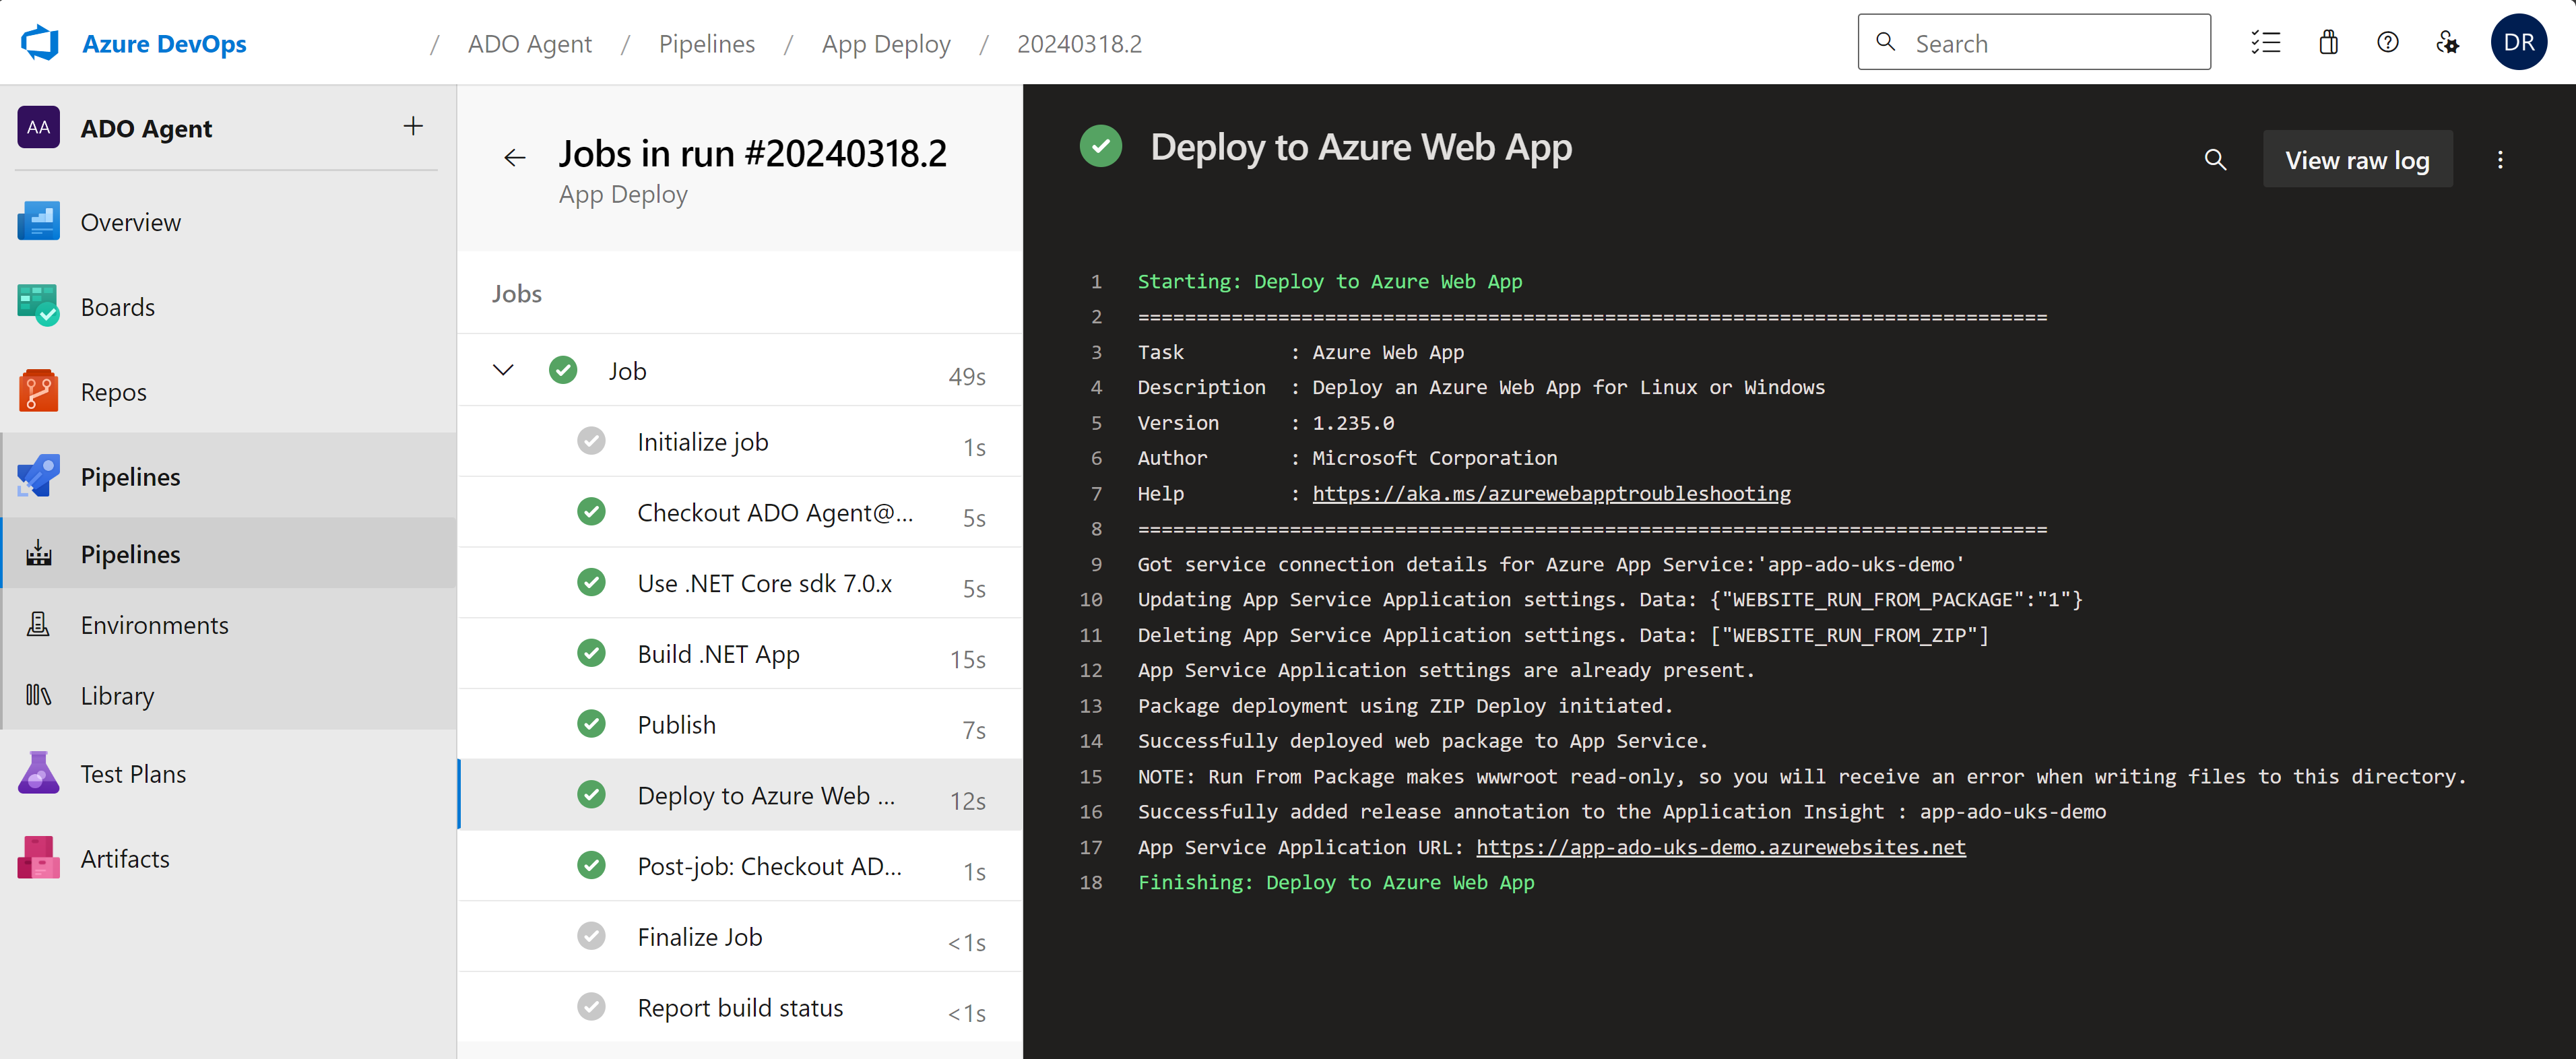
You can check the app itself has deployed either by temporarily opening the app up for public access to check the app URL page:

Or by reviewing the Deployment Center Logs tab for the history.

End
In conclusion, this solution not only prioritises security by design, which is crucial for WAF and compliance alignment when using a private Azure DevOps agent.
It also enables the use of serverless compute in Azure to deploy CI/CD pipelines originating from an internal virtual network, rather than public endpoints like Microsoft hosted agents in Azure DevOps. Additionally, it eliminates the need for a Virtual Machine to perform the same tasks, which is advantageous—I always strive to leverage cloud-native solutions where feasible.
If you’ve worked with private Azure Container Registry (ACR), you know how challenging it can be due to its numerous access limitations and quirks, complicating what should be a straightforward process and aligning it with your compliance requirements.
If you need to add dependencies/software/packages for your use case, then this solution will facilitate that, as you’ll be able to edit the dockerfile and the commit trigger will rebuild the image in the ACR for you.
While there are many articles online covering ACI with ACR, few delve into detailed L400-level explanations or utilise a fully private ACR end-to-end. I understand that many engineering teams and organisations have strict policies requiring public access to be disabled.
This motivated me to create a demo lab showcasing that it can be achieved, going further to demonstrate deployment to an App Service to mirror real-world scenarios.
I sincerely hope that others who come across this find it useful, insightful, and, most importantly, a time-saver by using it as a reference. I certainly learned a great deal from this experience!
Further Reading materials
https://learn.microsoft.com/en-us/azure/container-instances/using-azure-container-registry-mi?#grant-the-identity-a-role-assignment
https://learn.microsoft.com/en-us/azure/container-registry/container-registry-private-link?
https://learn.microsoft.com/en-us/cli/azure/container?view=azure-cli-latest&WT.mc_id=#az-container-create
https://techcommunity.microsoft.com/t5/azure-architecture-blog/build-image-with-containerised-self-hosted-azure-devops-agent/ba-p/3919105?
https://learn.microsoft.com/en-us/azure/container-registry/container-registry-tasks-overview?
Luke Murray with the same concept but for Container Apps: Get Ahead with Self-Hosted Agents and Container Apps Jobs | luke.geek.nz
Azure DevOps Pipeline deployments to Azure App Services with Access Restrictions – Rios Engineer