Introduction
I’ve been diving deep into API Management policies and exploring security around API access recently. It became clear that subscription keys are not secure—they can be easily stolen and used indefinitely if not regularly rotated. With this in mind, I thought it would be useful to outline one of the many ways to secure your organisation’s protected APIs using Entra token validation, both for local development debugging and when leveraging a managed identity from a Azure Web App.
Microsoft clearly state in the docs:
We recommend using a subscription (API) key in addition to another method of authentication or authorization. On its own, a subscription key isn’t a strong form of authentication, but use of the subscription key might be useful in certain scenarios, for example, tracking individual customers’ API usage or granting access to specific API products.
In this blog, I’ll cover the following topics:
- Setting up and configuring your Entra App to represent your API with a scope
- Creating the required app roles
- Creating the Azure API Management policy
- Demonstrating how to use the
DefaultAzureCredential.NET class for bearer token calls without the need for client secrets or local app environment variables - And more..!
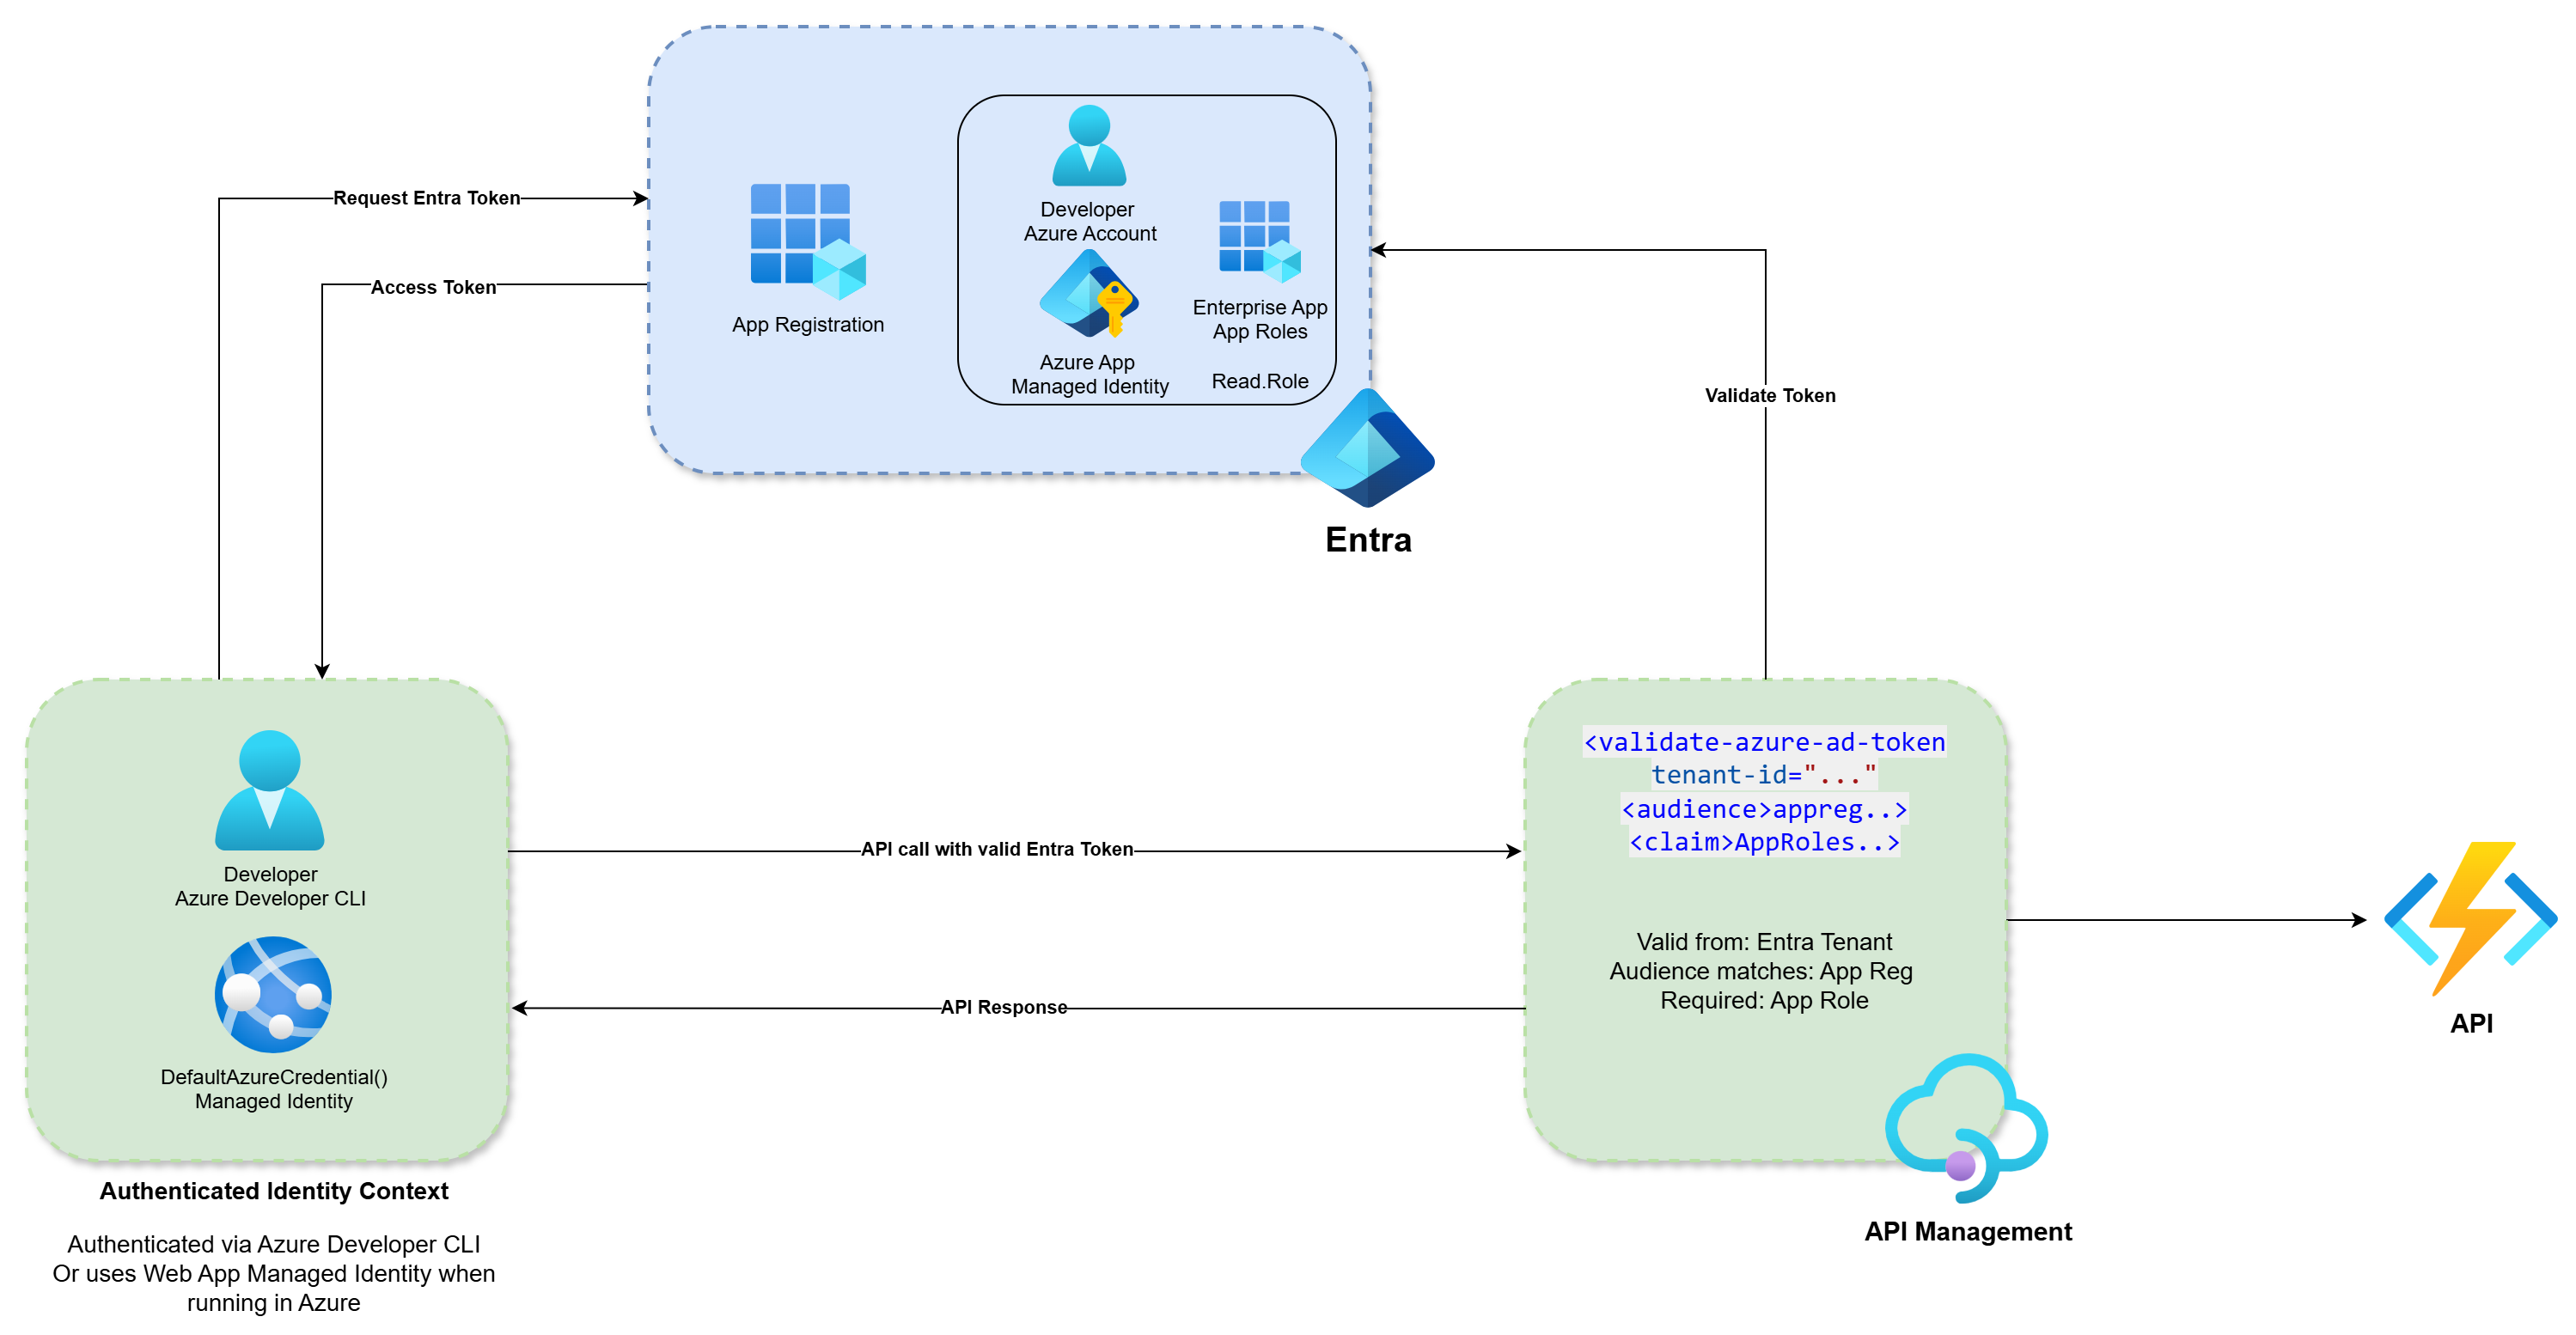
Entra Setup
The Entra setup can initially be a bit confusing, as this app registration does not have a direct relationship with your backend codebase. Instead, it serves as a representation of your API in Entra, acting as an object that allows you to scope and define roles for your API. These roles can then be verified by the API Management Gateway from the JWT (JSON Web Token).
The benefits of using this method include:
- Allowing more granular control compared to blanket entry from your tenant via a subscription key alone
- Centralising authentication through API Management (APIM) with Entra
- Enhancing security by reducing the risk of over-permissioned applications
Prerequisites:
- Application Administrator role in Entra
Steps:
- Log in to the Azure Portal and search for ‘App registrations’.
- Create a new app registration, give it a name (e.g. my-api), and leave all other settings as default.
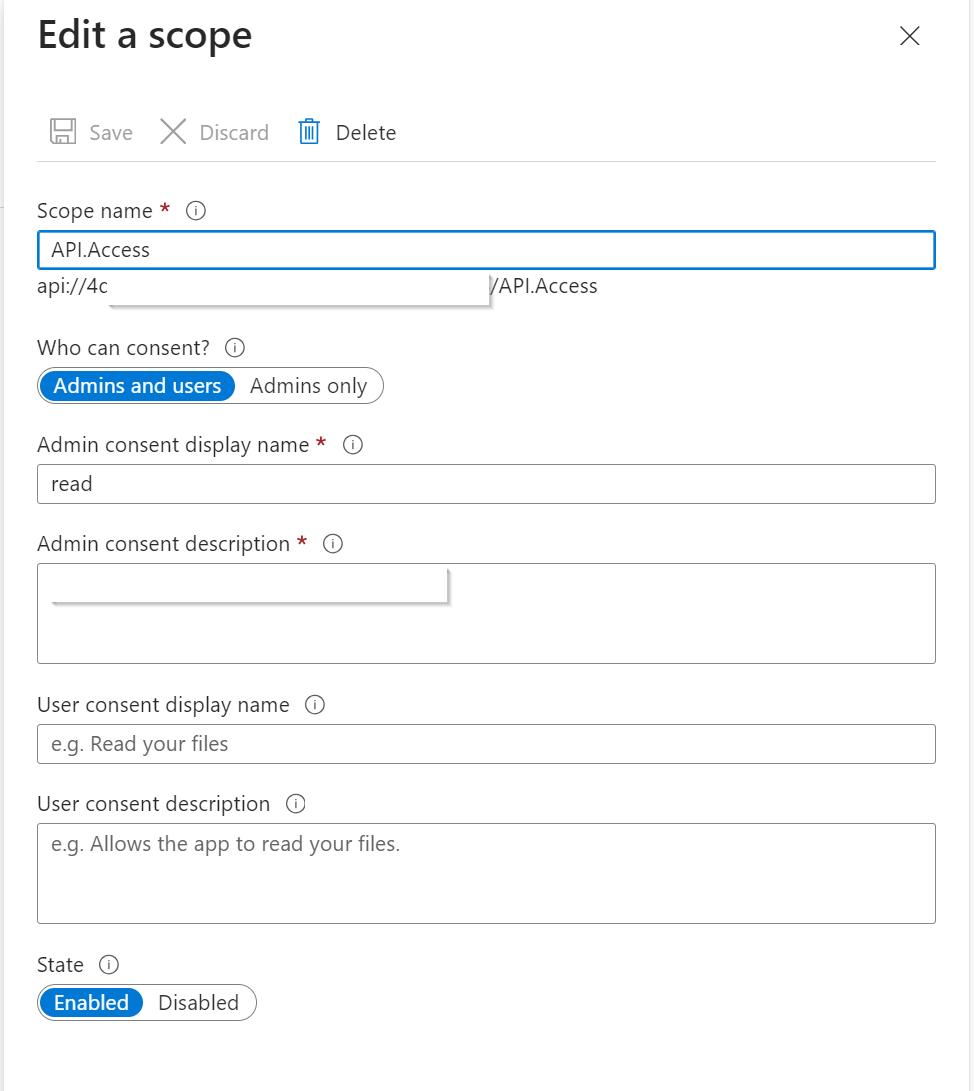
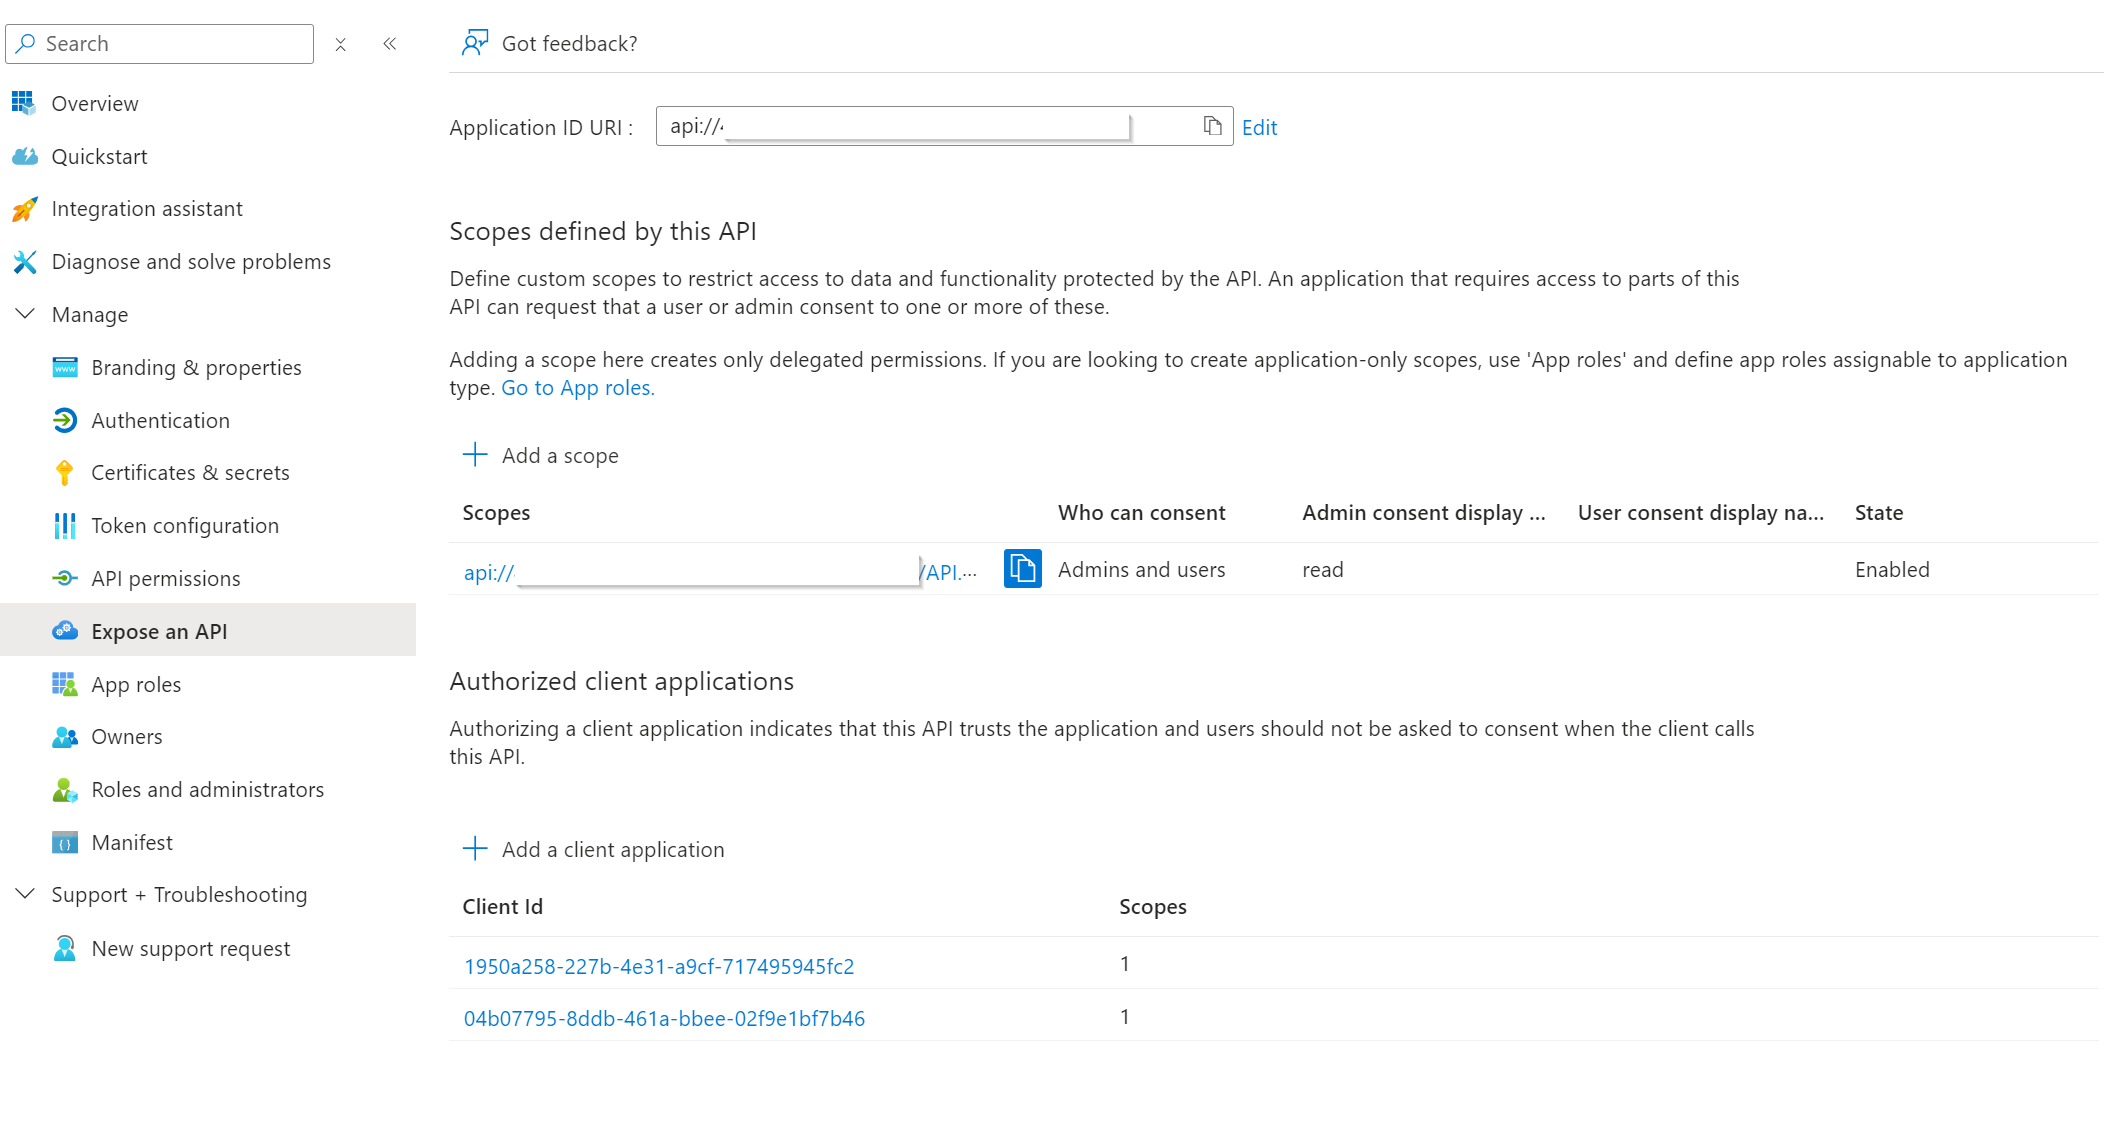
- Navigate to Expose an API > Add a scope > Provide the required details.
4. Add the Enterprise App Client Id for Azure CLI into the ‘Authorized client applications’ and select your authorised scope:04b07795-8ddb-461a-bbee-02f9e1bf7b46
This is a first-party Microsoft application, you can find a full list here. Adding the Azure CLI Microsoft application it will allow you to locally connect using the DefaultAzureCredential class in dotnet with the Azure Developer CLI.
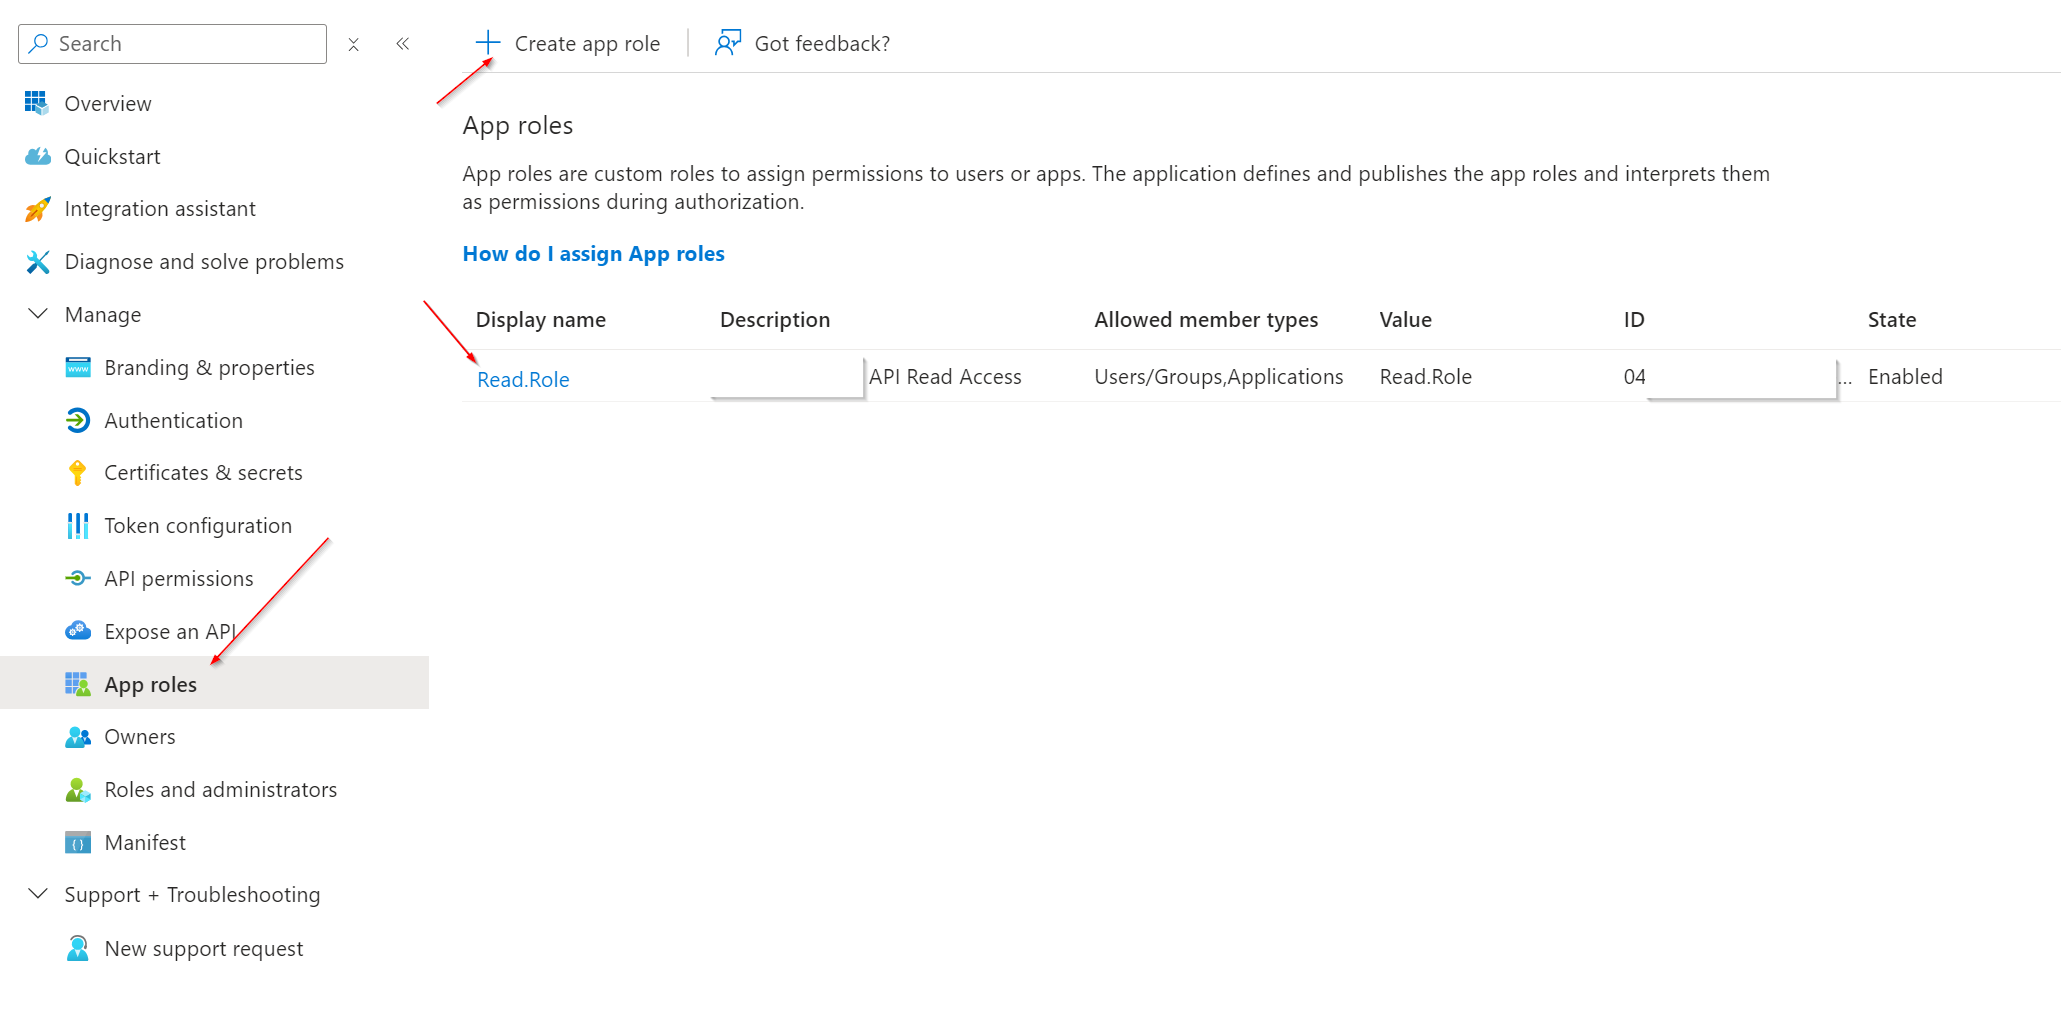
5. Go to ‘App roles’ > Create app role > provide a display name, allowed member types, value and description:
6. Now that there’s an Enterprise Application for your app registration (Service Principal) in Entra, you can assign users, groups and managed identities to the app to allow these principals to request the token scope setup. To add a managed identity (for example, an Azure Web App) you can follow the Microsoft docs here.
# Install the module.
# Install-Module Microsoft.Graph -Scope CurrentUser

# Your tenant ID (in the Azure portal, under Azure Active Directory > Overview).
$tenantID = '<tenant-id>'

# The name of your web app, which has a managed identity that should be assigned to the server app's app role.
$webAppName = '<web-app-name>'
$resourceGroupName = '<resource-group-name-containing-web-app>'

# The name of the server app that exposes the app role.
$serverApplicationName = '<server-application-name>' # For example, MyApi

# The name of the app role that the managed identity should be assigned to.
$appRoleName = '<app-role-name>' # For example, MyApi.Read.All

# Look up the web app's managed identity's object ID.
$managedIdentityObjectId = (Get-AzWebApp -ResourceGroupName $resourceGroupName -Name $webAppName).identity.principalid

Connect-MgGraph -TenantId $tenantId -Scopes 'Application.Read.All','Application.ReadWrite.All','AppRoleAssignment.ReadWrite.All','Directory.AccessAsUser.All','Directory.Read.All','Directory.ReadWrite.All'

# Look up the details about the server app's service principal and app role.
$serverServicePrincipal = (Get-MgServicePrincipal -Filter "DisplayName eq '$serverApplicationName'")
$serverServicePrincipalObjectId = $serverServicePrincipal.Id
$appRoleId = ($serverServicePrincipal.AppRoles | Where-Object {$_.Value -eq $appRoleName }).Id

# Assign the managed identity access to the app role.
New-MgServicePrincipalAppRoleAssignment -ServicePrincipalId $serverServicePrincipalObjectId -PrincipalId $managedIdentityObjectId -ResourceId $serverServicePrincipalObjectId -AppRoleId $appRoleIdOtherwise, it is a simple as going to Users and groups and adding what you need. Such as development teams security groups and managed identities of PaaS you wish to have access to your API.

That’s it for the Entra side! You should now have successfully configured:
- An Entra App Registration that represents your protected API in Azure with an exposed scope (e.g. API.Access).
- App roles that can be assigned to users, security groups, or applications (e.g. Read.Role or Full.Role—the names can be anything, by the way).
- The Microsoft first-party application Azure CLI as an authorised client application. This enables local development authentication using the Azure Developer CLI for local Azure IDE authentication (azd auth login) when executing code locally.
- A managed identity assigned to the Enterprise Application (Service Principal) of the app you want to consume your API (e.g. a system-assigned managed identity from an Azure Web App assigned as a Read.Role claim). Additionally, you may have assigned roles to your developers’ user accounts to allow for local debugging.
API Management Gateway Policy
Finally, you’ll need to configure your APIM policy to validate the Entra token for the API on the inbound policy. In the example policy XML below, I’ve included an inbound check to ensure that both the subscription key and the JWT bearer token are present in the authentication header of the request.
Using the validate-azure-ad-token statement you can use a control flow with a choose when condition. This will verify that the token is issued by the desired tenant ID, that the audience matches the correct Entra app registration, and that the claims include the required role necessary (Read.Role) to allow access to the backend API. If any of these conditions are not met, APIM will reject the request:
Policy
<policies>
    <inbound>
        <base />
        <!-- Check for subscription key-->
        <check-header name="Ocp-Apim-Subscription-Key" failed-check-httpcode="401" failed-check-error-message="Unauthorized. Subscription key is missing or invalid." />
        <!-- Check Bearer & Tenant  -->
        <set-variable name="token" value="@{var authHeader = context.Request.Headers.GetValueOrDefault("Authorization", "");
         if (!string.IsNullOrEmpty(authHeader) && authHeader.StartsWith("Bearer "))
            {
             return authHeader.Substring(7);
            }
            return null;
        }" />
        <set-variable name="iss" value="@(context.Variables.GetValueOrDefault("token", "").AsJwt()?.Claims["iss"]?.FirstOrDefault() ?? "")" />
        <choose>
            <when condition="@(context.Variables.GetValueOrDefault("iss", "").Equals("https://sts.windows.net/YOUR_TENANT_ID/"))">
                <validate-azure-ad-token tenant-id="YOUR_TENANT_ID">
                    <audiences>
                        <audience>api://APP_REG_EXPOSED_API_GUID</audience>
                    </audiences>
                    <required-claims>
                        <claim name="roles" match="all">
                            <value>Read.Role</value> // YOUR APP REG ROLE IN THE JWT
                        </claim>
                    </required-claims>
                </validate-azure-ad-token>
            </when>
            <otherwise>
                <return-response>
                    <set-status code="403" reason="Forbidden" />
                </return-response>
            </otherwise>
        </choose>
        <set-backend-service id="apim-generated-policy" backend-id="{{YOUR_API_BACKEND_NAMED_VALUE}}" />
    </inbound>
    <!-- Control if and how the requests are forwarded to services  -->
    <backend>
        <base />
    </backend>
    <!-- Customize the responses -->
    <outbound>
        <base />
    </outbound>
    <!-- Handle exceptions and customize error responses  -->
    <on-error>
        <base />
    </on-error>
</policies>In Action
Now that everything is (hopefully) in place, you can test the flow. When the .NET code runs in Azure, such as on an Azure App Service, it can leverage the system-assigned managed identity to request a token for the app’s scope.
If you recall from the Entra configuration steps, you would have added the managed identity to the Enterprise Application with an assigned app role. This allows the identity to request an Entra token with the correct resource URI and role from an application, which the APIM policy will validate before passing the request on to the protected API backend.
Similarly, when developers are working locally on their machines, they can execute the .NET code, which will still be able to request a valid token using their Azure account. This works because the Azure account has also been added to the Enterprise Application’s assigned role, either directly or via a security group.
If you’re unfamiliar with the DefaultAzureCredential class, I highly recommend reviewing the documentation here. The class provides several authentication options, and when it runs in your code, it will sequentially check for available methods. For this blog, I am specifically focusing on the Azure Developer CLI and the managed identity.
With this approach, the code can authenticate to Entra using either the managed identity (when running in Azure) or the developer’s Azure account (when running locally in an IDE). Below is a code snippet demonstrating how this works:
Code Snippet
// Note: I am not a .NET dev :) the below is just an example.
using System.Net.Http.Headers;
using Azure.Identity;
using Azure.Core;

var options = new DefaultAzureCredentialOptions
{
    ExcludeAzureCliCredential = false, // Excluding some credential options reduces local runtime during chain
    ExcludeAzurePowerShellCredential = true,
    ExcludeVisualStudioCredential = true,
    ExcludeVisualStudioCodeCredential = true,
    ExcludeEnvironmentCredential = true,
    ExcludeManagedIdentityCredential = false, // Enables Managed Identity context when running as PaaS
    ExcludeWorkloadIdentityCredential = true,
    ExcludeSharedTokenCacheCredential = true,
    ExcludeAzureDeveloperCliCredential = false, // Enables local dev azure auth when debugging locally
    // TenantId = "", add if guest or multi-tenant accounts and need DefaultAzureCredential to run against specific tenant
};
var credential = new DefaultAzureCredential(options);
var client = new HttpClient();
var scopes = new[] { "api://GUID" };
if (Environment.GetEnvironmentVariable("ASPNETCORE_ENVIRONMENT") == "Development") // adds SCOPE for local user flow auth if dev
{
    scopes = new[] { "api://GUID, "API.Access" };
}

var accessToken = await credential.GetTokenAsync(new TokenRequestContext(scopes));

client.DefaultRequestHeaders.Add("Ocp-Apim-Subscription-Key", "APIM_SUB_KEY"); // add APIM subscription key to header
client.DefaultRequestHeaders.Authorization = new AuthenticationHeaderValue("Bearer", accessToken.Token); // add Entra Token to auth header

var result = await client.GetStringAsync("https://api.contoso.com/v1/...."); // send some API request1. No need to maintain app registration certificates or secrets.
2. Developers do not need to store credentials locally or retrieve them from a remote Key Vault.
3. Works seamlessly both in Azure and locally without any configuration changes. As long as developers are authenticated in the IDE, the application will run, and API calls will function as expected.
Code run – NO MORE SECRETS!
- Authenticate to Azure using the Azure Developer CLI (for local development) or via a Managed Identity (when running under PaaS).
- Request an Entra token for your scope/role, as configured in the previous steps (red block).
- Add the subscription key and bearer token to the authentication header.
- Send the API request to APIM, where the policy will validate it.
- Receive the response (green block).
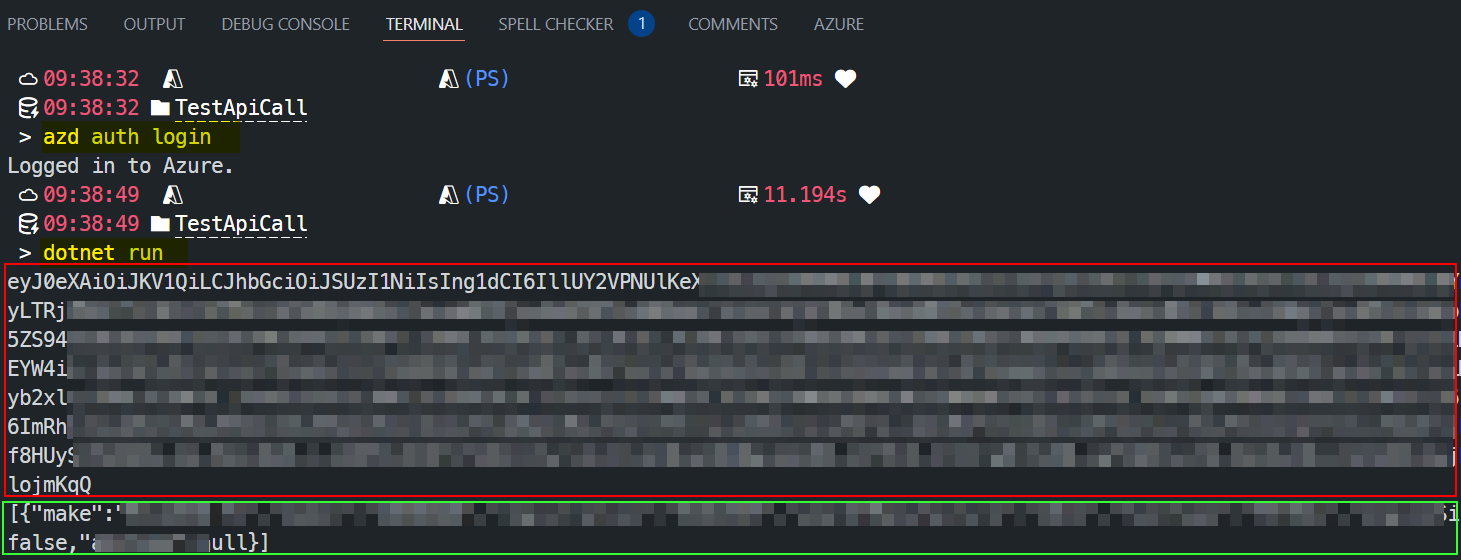
Let me know if you got this working with Visual Studio, or even Visual Studio natively. I had many issues and could only get a seamless experience using Azure Developer CLI. Even Azure CLI gave me issues which I could never figure out. See more: Azure CLI doesn’t return token for scope: ERROR: (pii). Status: Response_Status.Status_IncorrectConfiguration, Error code: 3399614475, Tag: 508634112 · Issue #30491 · Azure/azure-cli
Testing in an Azure App Services
If you want to test and troubleshoot whether the Azure App Service can retrieve the token through a managed identity, you can do so via KUDU SCM. Navigate to Overview > Advanced Tools > Go > Debug > PowerShell to open a PowerShell terminal for your Azure Web App or Function. Then, execute the script below to check whether you receive a token and API response from the setup without using programming code.
This can be useful for cloud engineering teams who need to verify that the solution is fully functional at the platform/infrastructure level before handing off to developers.
App Service has environment variables for a local token service, using the IDENTITY_ENDPOINT & IDENTITY_HEADER it can use the localhost to construct a URL to request the Entra token.
It works! And that’s fantastic because you’ve successfully secured your API to API calls with assigned app roles, APIM policy to validate and managed identities!
Token
Now, let’s take a closer look at the token to fully understand how APIM validates that the bearer token is valid. By examining the token on https://jwt.io, you can see that the payload contains all the necessary information for APIM to validate it against the validate-azure-ad-token policy:
- The audience (
aud) matches the exposed Entra App API. - The issuer (
iss) is from the expected tenant. - The role matches the app roles you configured in App Roles.
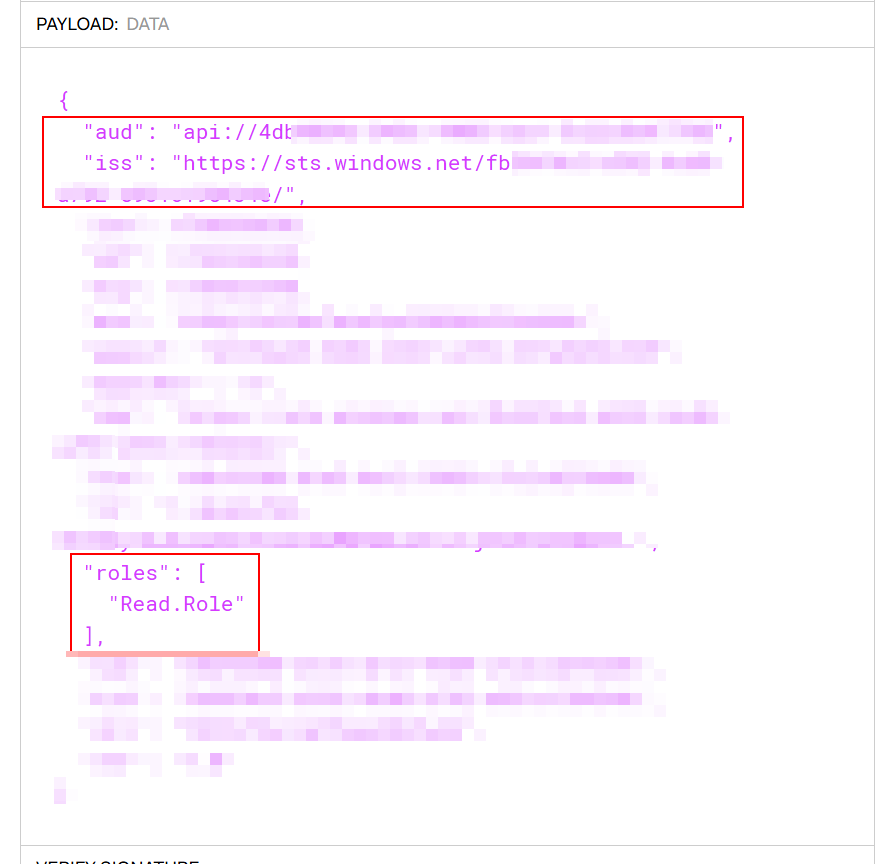
If you refer back to the policy example above, you’ll see how everything ties together nicely.
Conclusion
This is a great way to enhance your security posture for APIs in Azure. One of the biggest benefits is the seamless developer experience—you no longer need to store local secrets as environment variables, for example. By adding groups and identities to the Enterprise Application, you can centrally control access without the management overhead of maintaining secrets, while also benefiting from granular control and streamlined authentication.
Although I am still learning more about APIs and cloud software design, I’ve found this journey to be a valuable learning experience. It’s helped me better understand tokens, the developer experience in the cloud, and security.
One major issue I encountered in this setup was that I could not get Azure CLI or VS Code IDE (or any other method for that matter…) Azure authentication to work with the DefaultAzureCredential chain. It just didn’t seem to cooperate. Let me know in the comments if you managed to get it working though.
Nice, finally a decent post on how to protect api’s in APIM with a managed identity. Thank you!
Thank you Antonie!