Introduction
Finding a robust validation solution for Bicep has been both straight forward and frustrating. We have amazing tools like PSRule (shout out to Bernie for his incredible tool here) for best practice. And more straight forward ones provided natively by Microsoft such as the Bicep linter.
However, the problem in my opinion, when it comes to seeing what would actually deploy with Bicep, we hit a few snags and limitations currently.
With Terraform, a plan output will tell us what is going to be created, deleted or changed. We don’t really have feature parity equivalent with Bicep yet. There is the ‘what if’ function – but it’s fundamentally broken so we have no real output to verify what Bicep will deploy, natively at least.
What if will not work for nested resources, rendering is quite useless for production. You can check more information on the issue here: Resources in nested template not shown if reference is used in the parameter values · Issue #157 · Azure/arm-template-whatif (github.com) and comment to help push this issue along.
However, this means when we talk about a Bicep validation pipeline I find it difficult to put what if as part of the jobs because it is not always representative – hence why you won’t see me use it below. (The Bicep team are aware and are looking to resolve this soon). Now that my rant is over we can get into the juicy stuff :).
So what does my version of the bicep validation pipeline look like at the moment, and how do you implement this to your Azure DevOps environment?
Pre requisites
Some components to this which you’ll need to run through the rest of the guide smoothly.
- Azure tenant and subscription (at least contributor rights)
- Defender for Cloud (at least Security Admin role)
- Azure DevOps organisation setup & project
- ADO Organisation owner
*Defender for Cloud DevOps Plan is free to use during preview
Validation pipeline components
Microsoft Security DevOps scan
Since we’re taking advantage of the Defender for Cloud by connecting it to our ADO repository, we can leverage this to scan our Bicep with PSRule, secrets and containers if required.
MegaLinter
MegaLinter is a super linting tool that can run against a huge list of codebases, such as Bicep (arm-tkk), json, yaml, markdown, etc. So it’s a useful tool to validate our repository files with – as it will ensure the repository remains in good order.
MegaLinter will also run the Bicep linter tool for us so we don’t have to have a separate linting job.
Getting started – ADO components
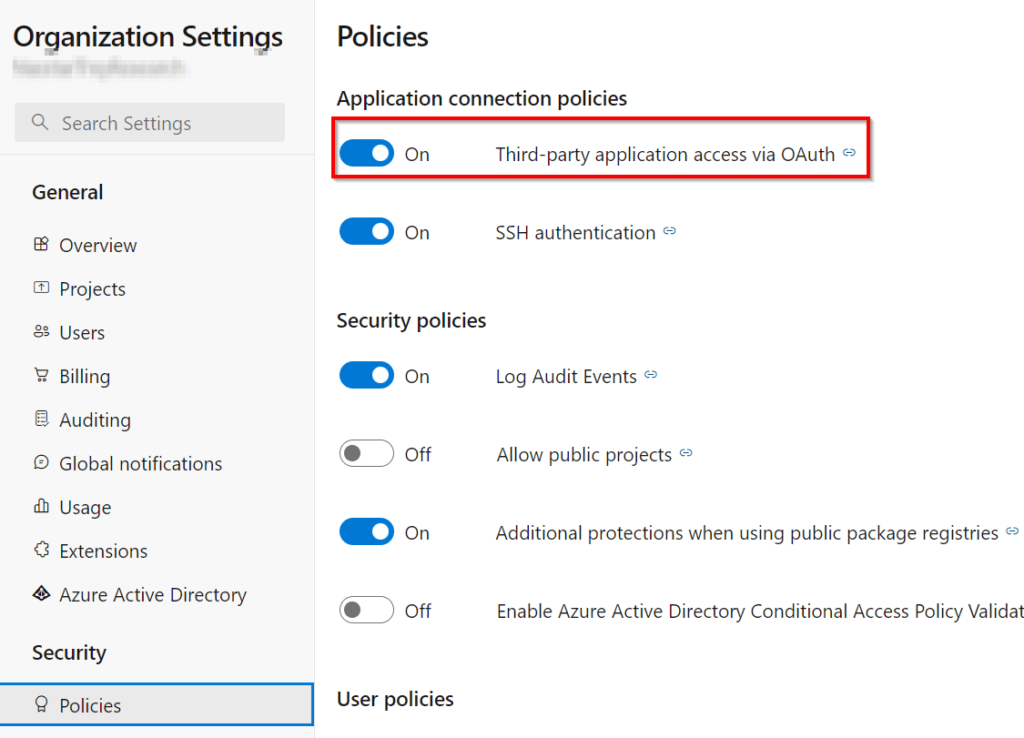
ADO third party access
- In your ADO organisation settings go to security / policies and enable third-party application access via OAuth
Service connection
- Create a service connection to your subscription in the Azure DevOps Project:
Microsoft already provide a comprehensive step-by-step for this here: Service connections in Azure Pipelines – Azure Pipelines | Microsoft Learn
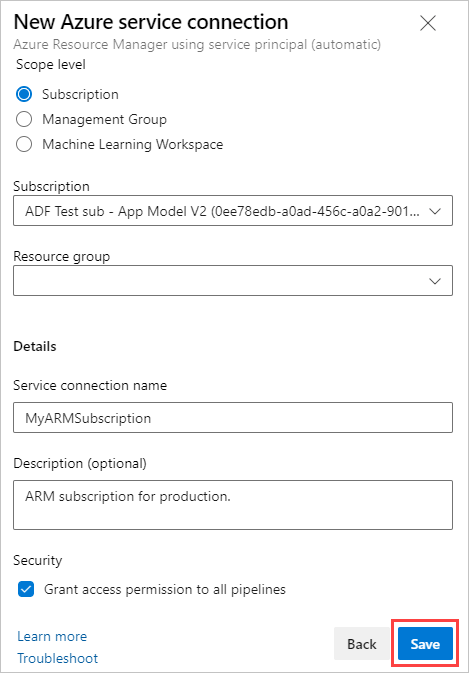
2. Scope to the subscription and give it a relevant name. Take a note of this connection name for later.
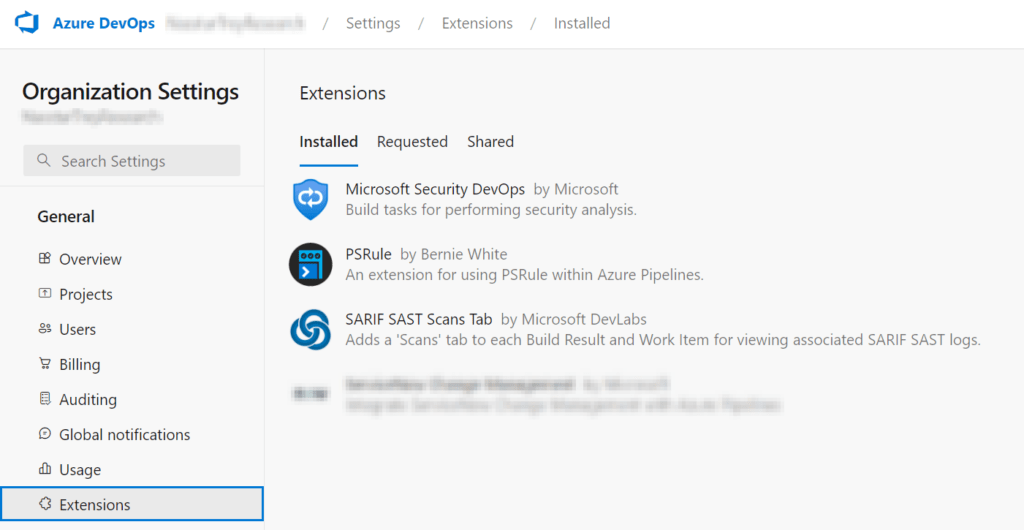
Install required Azure DevOps extensions
In order for the bicep validation pipeline components to run we need to install some extensions into the ADO organisation so our project can utilise them:
- Microsoft Security DevOps
- SARIF SAST Scans Tab
- PSRule (Optional: Defender uses PSRule so it’s not necessary but a nice to have in the organisation anyway so I recommend having it there)
Defender for Cloud – Connecting to your repository
For Defender for Cloud to connect and run scans we must first connect it into the ADO organisation & repo. This is currently in preview so it is free until it moves onto GA. I won’t actually go into too much detail here, mainly Microsoft have great documentation on how to set this up which you can run through here:
Connect your Azure DevOps repositories – Microsoft Defender for Cloud | Microsoft Learn
- Add the ADO environment
- Create the connector, giving it a relevant name, subscription and selecting a resource group for it to reside in
- Select the region. While in preview it is limited to only a handful.
- Enable the Defender for DevOps plan
- Authorise the connection to ADO (this is where the third party access is required from earlier)
- You can further scope the org & project in the connection settings to a specific org and/or project with auto discovery on
Validation Pipeline
Creating the YAML file
This is mostly assuming you’re a greenfield ADO project deployment.
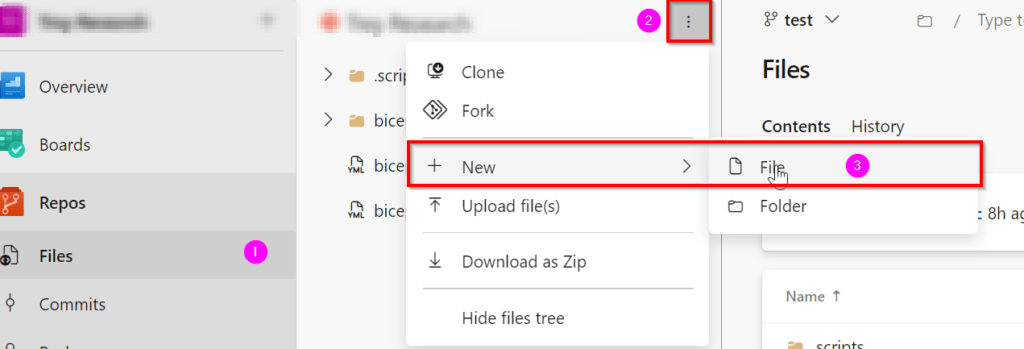
- In your ADO project, if you haven’t already, initialise the repository to create the repo
- On the left, select Repos > Files > Select the meat balls to create a new file – give it a name like bicep-validation.yaml (or whatever you wish)
If you have branch policies and you already sync a copy of your repo locally via Git then you’ll already know how to create a new file in your root repo, and push this up to your repo.
4. Copy and paste in the YAML pipeline amending the ‘azureServiceConnection’ to the one noted from earlier
bicep/ado-pipelines/bicep-pr-pipeline.yaml at main · riosengineer/bicep (github.com)
# The ultimate Bicep validation Pull Request Pipeline

trigger: none

variables:
  vmImageName: 'ubuntu-latest'
  azureServiceConnection: 'ConnectionNameHere'

pool:
  vmImage: $(vmImageName)

stages:
- stage: Validation
  displayName: 'Validation'
  jobs:
      - job: MicrosoftSecurityDevOps
        displayName: Microsoft Security DevOps scan
        steps:
          - task: MicrosoftSecurityDevOps@1
      - job: MegaLinter
        displayName: Mega Linter
        steps:
          - checkout: self
          - script: docker pull oxsecurity/megalinter:v7
            displayName: Pull MegaLinter
          - script: |
              docker run -v $(System.DefaultWorkingDirectory):/tmp/lint \
                --env-file <(env | grep -e SYSTEM_ -e BUILD_ -e TF_ -e AGENT_) \
                -e VALIDATE_ALL_CODEBASE=false \
                -e SYSTEM_ACCESSTOKEN=$(System.AccessToken) \
                -e GIT_AUTHORIZATION_BEARER=$(System.AccessToken) \
                oxsecurity/megalinter:v7
            displayName: Run MegaLinter
          - task: PublishPipelineArtifact@1
            condition: succeededOrFailed()
            displayName: Upload MegaLinter reports
            inputs:
              targetPath: $(System.DefaultWorkingDirectory)/megalinter-reports/
              artifactName: MegaLinterReport

  - stage: Build
    jobs:
      - job: ArtifactDrop
        displayName: Build Bicep Artifact
        steps:
          - task: ArchiveFiles@2
            inputs:
              includeRootFolder: true
              replaceExistingArchive: true
              rootFolderOrFile: $(System.DefaultWorkingDirectory)
              archiveType: tar
              archiveFile: $(Build.ArtifactStagingDirectory)/$(Build.BuildId)-bicep-plan.tgz
          - upload: $(Build.ArtifactStagingDirectory)/$(Build.BuildId)-bicep-plan.tgz
artifact: $(Build.BuildId)-bicep-plan.tgz5. Commit the changes
Creating the validation pipeline
Now to create the pipeline!
- On the left navigation pane go to Pipelines > New Pipeline button at the top right
- Select Azure Repos Git
- Select your repository
- Select ‘Existing Azure Pipelines YAML file’ and the drop down should show your YAML file created earlier
- Save the pipeline

Create the Azure DevOps build validation policy
Next we need to create the validation policy in Azure DevOps branch to ensure the pipeline will run when a pull request is made to your main branch.
A small qwirk in ADO is no matter what you put in your YAML trigger (e.g. trigger: pr) it will not trigger on PR. We must set a validation policy via repository policies in case you were wondering!
- Go to the project settings
- Click on Repositories
- Click on Policies
- Go to Branch policies at the bottom and select your main branch
- From here you can click on the Add button to create your validation policy:
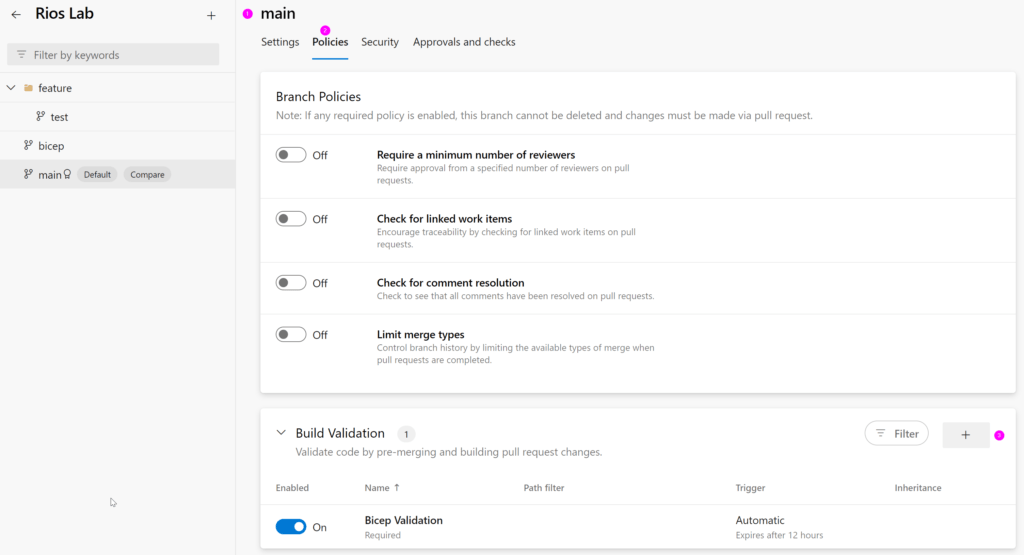
When you go to add a new build validation, you will be able to select the YAML file we created earlier from the drop down and specify other necessary requirements you may have for pull requests.
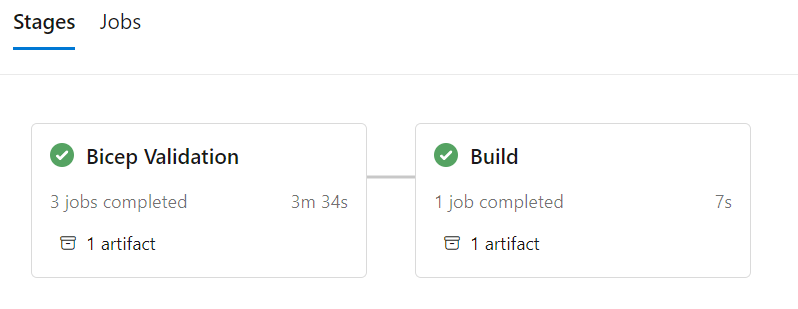
Pipeline overview
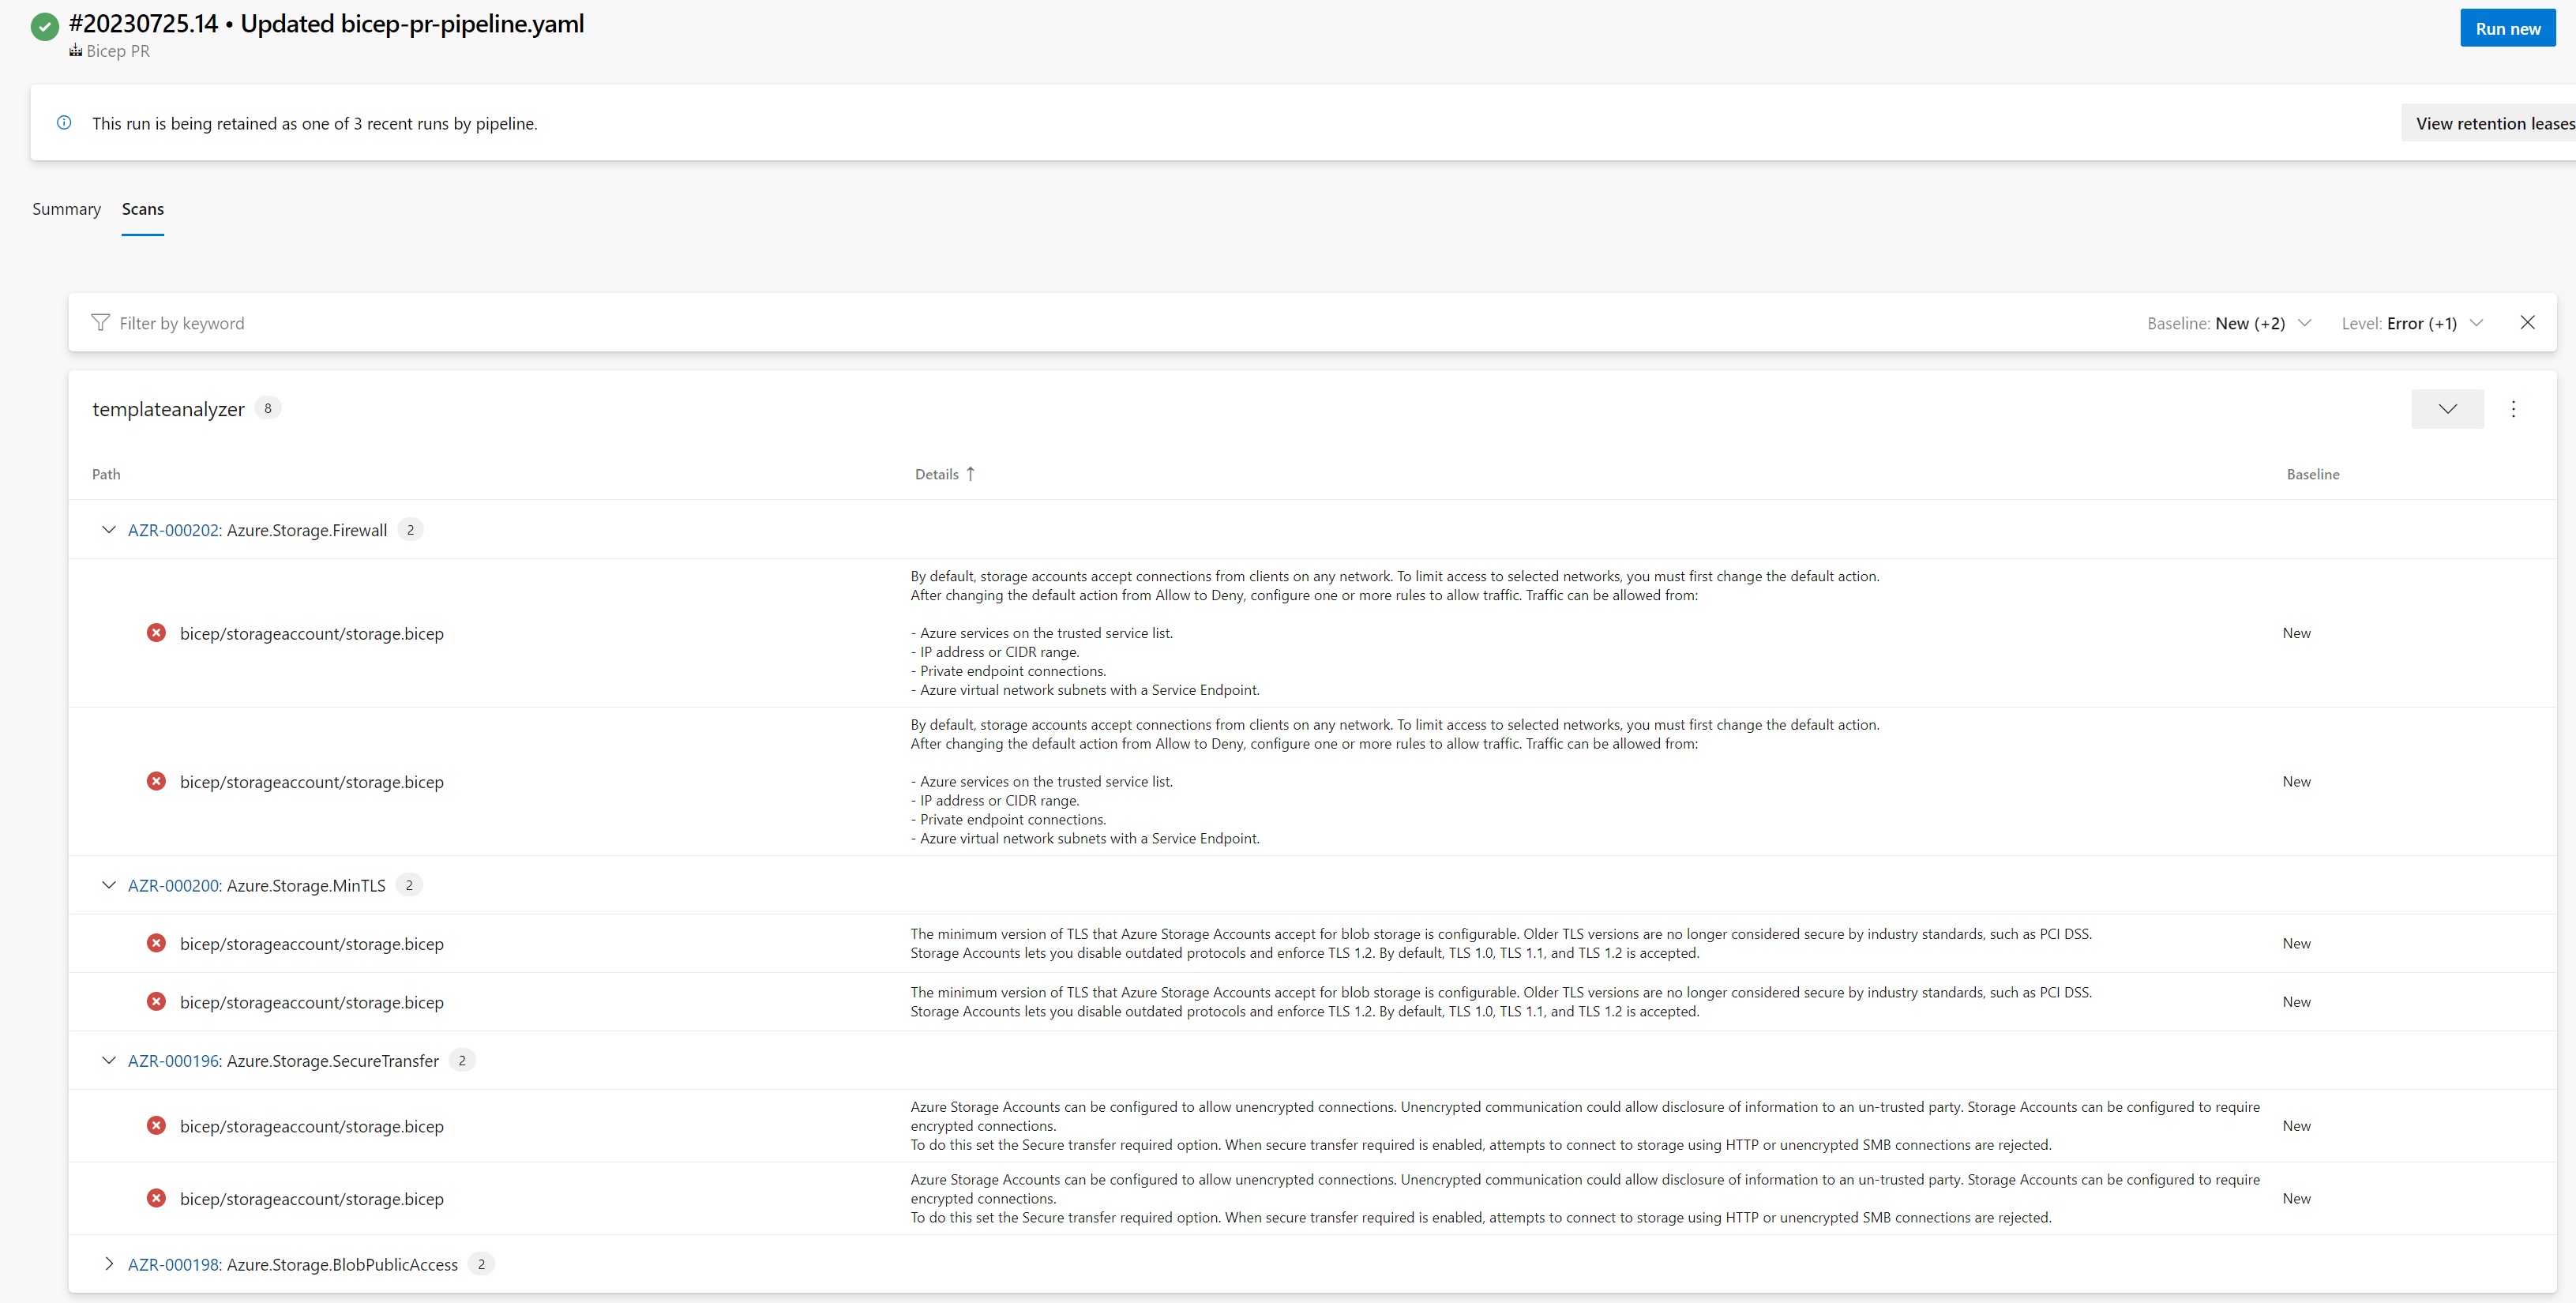
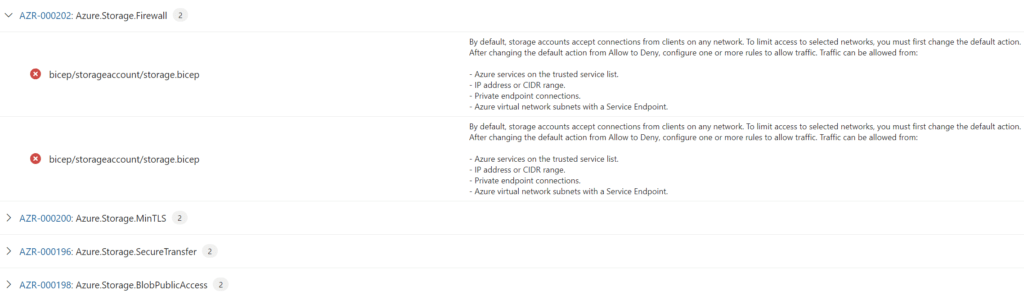
Defender for DevOps scan output for Bicep files
Because we installed the SARIF SAST Scans Tab extension, we now get a ‘scans’ (next to summary) tab to review the Defender for DevOps report on the pipeline.
This Defender for DevOps scan leverages PSRule. Each of the recommendations takes you to a rule giving you great detail on the recommendation and how to remediate.
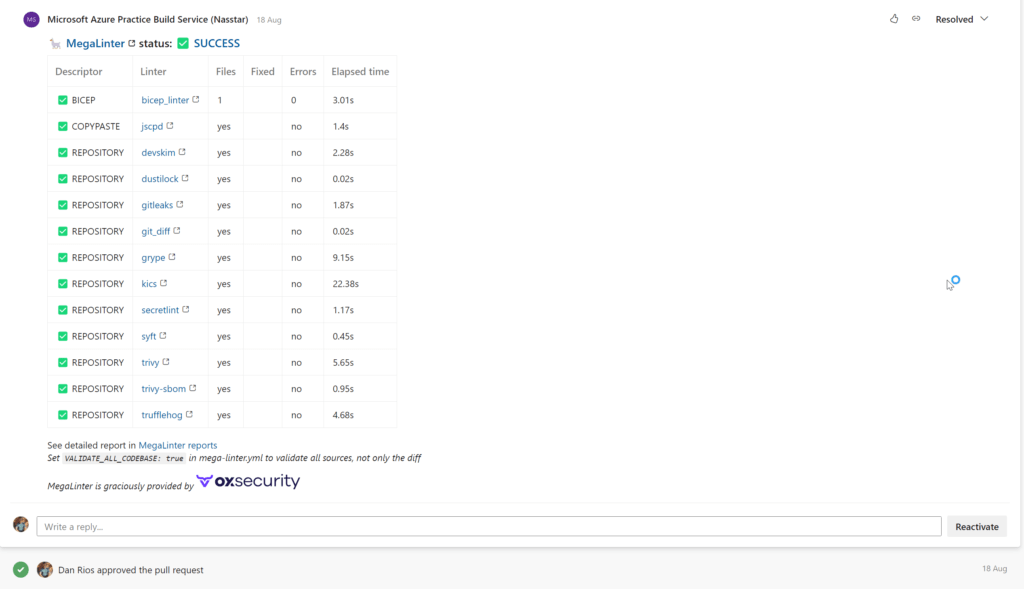
MegaLinter output
So MegaLinter isn’t specifically for Bicep only, but it offers such vast linting features across tons of codebases that I feel it’s too good to miss out on – not only for your Bicep files but also other scripts, readmes, etc.
Our output example:
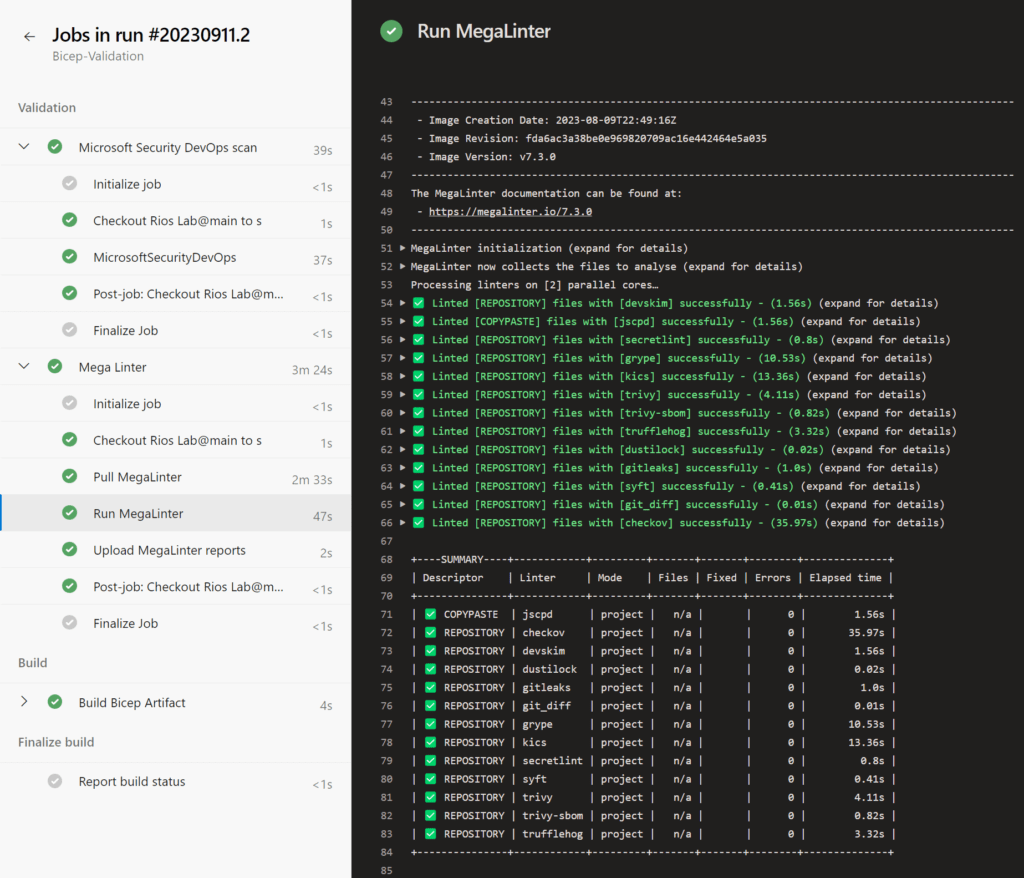
MegaLinter also supports Pull Request annotation – so the report can be automatically posted as a comment in the PR on completion, which is really nice.
Build stage
Lastly, the build stage. All we’re doing here is packing up the current files in the pull request into an ADO pipeline artifact. We can then utilise this in other pipelines or do more in terms of CI/CD as a next stage if required.
We’re finally done?
Yup. That’s it.
This is my current go to for Bicep validation for now. It’s definitely up for debate on if you could add other checks in, or remove some. I would like one day to add what-if to the validation and deployment stages knowing with confidence they will give us the true output.
Ideally, a lot of these checks are caught from the Bicep VSCode extension so we’re shifting left the issues right into the code phase. However, I like the gate keeping controls this pipeline components provides, especially best practice recommendations and more.
Hope you enjoyed the right up!
Thanks for reading and feel free to comment how you’re doing this, do you have a different approach?
3 thoughts on “The ultimate Bicep validation pipeline guide: ADO Edition”